You just used your trusty SeatGeek app to score a ticket to see LeBron and the Cavs take on J Wall and the Wizards in D.C. How easy was that?
What if I were to tell you that your game ticket includes an invitation to SeatGeek’s Tip-Off Party, where you can drink ample beer and eat some great bites fo’ free? Would you believe it? You better believe it!
In addition to creating the best experience for users shopping for live event tickets, SeatGeek also aims to create the best experience surrounding your game night. Therefore, we’re rolling out a set of pre-game parties at Penn Social in D.C. before select Wizards games. Here’s how it works:
Log into your SeatGeek account on your app or our website.
Buy a ticket to one of these select Wizards home games:
Get an invite via email to the Tip-Off party at Penn Social right around the corner from the Verizon Center.
Show up with a smile and have some drinks, eats and fun. Be sure to share all of your photos to #SGTipOff
What can you expect at a Tip-Off party? Besides free beer and a free buffet of bites, we’ll be hanging out with other Wizards fans who bought tickets on SeatGeek and playing games with prizes such as Wizards gear, SeatGeek swag and future Wizards tickets. Some lucky people may even get their seats upgraded to the game that night! Wait, we said free beer and food, right?
Expect to see more SeatGeek events surrounding the tickets you buy to games, concerts and Broadway shows. Whether it’s a pre-game party before you see your favorite team, a soundcheck experience with your favorite band, or a meet & greet experience with the cast of a Broadway show — it’s just our way of saying thanks for being you, good-looking SeatGeek user.
Have any questions, comments or feedback? We want to hear it! Send an email to party@seatgeek.com.
Here at SeatGeek, we recently launched version 2.0 of our Android app, a major update to the version we launched a little over a year ago. The new release includes features such as authentication with your SeatGeek account, the ability to track performers and events, and notifications for deals or newly announced events. It also includes a major face lift from version 1.0 to offer a cleaner and more refined UI that is more consistent with the experience we target here. The most impressive thing about this release, however, was that it was executed almost entirely by a team of two engineers, with one of them only focused on Android about 50% of the time. This is only possible because of the things that SeatGeek has that I believe you need to build a successful Android application at a small scale.
Choosing the Right Tools
We use a number of tools on a daily basis to build the SeatGeek app. A non-exhaustive list looks something like this:
Git, Github, Jenkins CI, Gradle, Android Studio, Crashlytics, Google Analytics, Dagger, RxJava, Retrofit, Otto, Picasso, Mockito, JUnit, Roboelectric, Spoon, Hackpad, and Mao Mak Mak (our internal kanban board, built on top of Github issues)
We know we’re not the only ones using these tools, but we know that our use of them allows us to iterate faster and avoid common errors that come with application development. Developer productivity, sanity, and satisfaction almost always take priority as we’re building out new features in the application. We are very proactive about accepting new tools as part of our workflow; if we can prove that there’s a productivity increase, that’s usually enough for us.
We’re buyers on RxJava. Netflix’s port of .NET’s Reactive Extensions has simplified and enhanced many parts of our app. We started with porting our networking-layer code over to RxJava with Retrofit during the 2.0 release, and we’re very close to having all of our network requests served through it. The powerful composition tools and high-level stream manipulations have made producing some of the most complex views in our app much more concise by reducing state management and simplifying the data paths. RxJava may not solve all of Android’s complexities with concurrency, but it’s the best tool we’ve used yet.
We’re also fans of Dagger. Square’s lightweight dependency injector made DI a viable pattern to use in Android apps by reducing the runtime overhead seen in other injectors. We love Dagger because it makes getting all the useful classes you need into your Activities, Fragments, and Views incredibly easy. As an added bonus, by following the patterns promoted by DI, our application’s components are more decoupled and easier to test. The latter point has been instrumental in helping us with our growing test suite for the application.
Hiring The Right Team
I don’t think this is a particularly insightful point, but it is the most important. In order to do anything successfully at at any scale you need a team of people capable of executing on a shared vision. At SeatGeek, we focus on hiring a team of product-minded engineers that are capable of wearing multiple hats. Our Android Lead, Dallas, is just as comfortable in Photoshop as Android Studio, and there’s a reason for that. In order to build an application experience that users are going to find delightful and exciting, you need a particular type of engineer that is conscious of the UX of the things that they are building and is willing to be autonomous in polishing it. Dallas is often relied upon to drive product and design decisions around the Android app, and he has the skill set to do it.
Dallas is not a one man show, though. We have our in-house designers that work closely with the Android team to iterate on features and help provide structure to the design process. Over the course of the 2.0 release, the design team collaborated with the Android team to build a Style Guide that can be reused throughout the application. With our Style Guide in hand, Dallas and I can make safe assumptions about our design decisions without running risk of violating over-arching design principles in the application. Our Style Guide draws heavily from the Android platform’s Style Guide and it helps that our chief mobile designer, Mladen, is as in love with Material Design as we are.
Finally, we have a product development team that’s committed to producing not just a quality product, but a quality Android product. To SeatGeek, that means staying true to the Android platform’s design guidelines; monitoring our application’s performance in terms of network usage, battery drain, and error rates; and targeting Android devices running Ice Cream Sandwich and higher. We understand that there may be Android users still running a version <4.0 of the OS, but we care much more about developer sanity and productivity than potential user base – plus, SeatGeek is killing it with users running Android 4.4.
Being Whimsical
If you spend any time around our Android team, you may hear the word “whimsy.” You may even hear it a few times. Alright, you’ll probably hear it a lot. “Whimsy” is our descriptor for what most people would call “delightful design details.” We love whimsy around here, because we believe that those little details are part of what keep our users coming back. Also, they’re fun to build.
One of our favorites is the empty state indicator in our My Performers section of the app. When an authenticated user visits this screen, usually they’ll see all the performers they’ve tracked for event updates and notifications. But if the user is new, they may not have any performers to show yet. Since people love their favorite performers, we knew that a heart was the perfect icon to display here. The problem is, a static heart icon lacks “whimsy” (and life). To correct this and make our heart more lifelike, we decided to make it beat:
In making the heart beat, we probably could have used a simple, repeating scale up-scale down animation. We decided to be a little more accurate than that. We wanted to model a real heart beating, so we dusted off our old anatomy textbooks and studied the T-wave produced by an ECG machine. We plotted out one full period of the wave and extracted mostly-accurate timings for each phase of the wave (for a mathematical breakdown of the ECG Fourier series, this is a good start). We popped these timings into our code and the result did not disappoint. It’s the little details like a heart beating that we strive to get right to take our app to the next level.
Final Thoughts
We believe we have all the right pieces for building a successful Android app at a small scale here at SeatGeek. We have great tools, the foundation of an incredible team, and our app is packed full of “whimsy.” If you’re working on a small Android development team and you’re looking to improve your process, look no further than investing in your tools, improving developer sanity, and evaluating your team’s commitment to building a product your users will love. Your developers will thank you, and your users will follow–whimsically.
Oh and by the way, if any of this interests you, we’re hiring.
Having a lot of data can be both a blessing and a curse. It’s wonderful to have data, but managing it well can be a headache. Here at SeatGeek, our data come from a variety of sources in a variety of formats, and these aren’t always accessible or easily analyzed in their original form. On a daily basis, we use ElasticSearch, MySQL, Redis, and S3 to handle and store major parts of our data. We have a lot of internal services that process and output data in different ways, and we also rely on external data sources like Google Analytics and various partner APIs.
The problem: data accessibility
Many of the wider-scale business questions we’re interested in require that we look across all this data at the same time, which can be painful to do when these data sources aren’t smoothly integrated. In the past couple of months we started attacking this data underutilization problem in earnest by investing a good bit of time in building out our data architecture with a shiny new pipeline and data warehouse.
Some backstory for this: we use MySQL as our main production datastore, and up until our revamp this datastore supported most of our analysis as well (ouch). Expectedly, we faced a host of recurring issues that paved the path for us to finally pull the trigger on this project. All these problems could be grouped under a common data accessibility theme, in a couple of different ways:
The data isn’t there
Most of our important data is in MySQL of course, but we have a lot of goodies in ElasticSearch, S3, etc. that for all analytics intents and purposes were gathering dust. A great example is Sixpack, our Redis-backed A/B testing framework
The data is there but isn’t formatted well
Data formatted to be easy for the app to process but is awkward to analyze (EX: key-value blobs), data baggage - legacy naming conventions that no longer make sense, etc.
The data is there but isn’t organized well
Separate tables that should be one, huge tables that we can’t feasibly use because MySQL isn’t optimized for analytical queries
The data is too accessible! (We just can’t win)
When interns are running queries against the production DB1, it’s time to make a few changes…
The solution: Looker, Redshift, and Luigi
Looker:Looker is a BI service that hooks on top of your datastore with its own data-modeling language to provide a nifty frontend layer to the data. We actually were interested in using Looker way before we started revamping our data stack, but when the first complex query we tried in MySQL took 20 minutes to return, it was essentially the last straw.
Most of our crew here is pretty SQL-savvy, but when many queries are being run daily to return summary stats, it’s useful to have those results automatically pop up in a digestible and visually pleasing way. Additionally, some of those queries contain complex business calculations, and when needing answer one-off questions or investigate a certain window of time, it’s handy to have that all consistently defined and saved. As an example of the neat visual insight a Look can provide, here’s a map of clicks on Super Bowl tickets since the end of the championship games showing the localization due to team and venue:
Redshift:Redshift is Amazon’s cloud-based analytical datastore, a columnar datastore based on PostgreSQL. A main benefit of columnar datastores is that column-stored data is far more optimized for the ‘many rows, few columns’ summary queries that analysts are interested in running than is row-stored data (the 20-minute query above took maybe half a minute in Redshift).
Why Redshift in particular? The choice was simple as we already use many of Amazon’s services, and Redshift is straightforward to set up and scale. Some of our own data services already write directly to S3, and it’s extremely easy to load data into Redshift from S3. We can also easily loop EMR, Amazon’s map reduce service, into our data pipeline.
A lot of best practices are well documented in Amazon’s Redshift user manual, so you can easily get up and running with settings already tuned for query speed. For instance, distribution keys collocate tables that are commonly joined together; sort keys identify columns that tables are most often ordered by. Admittedly, a lot of these options are simple, and Redshift lacks a lot of PostgreSQL features that allow for more advanced customization and data processing. Fortunately, we’ve been able to work around this using Luigi.
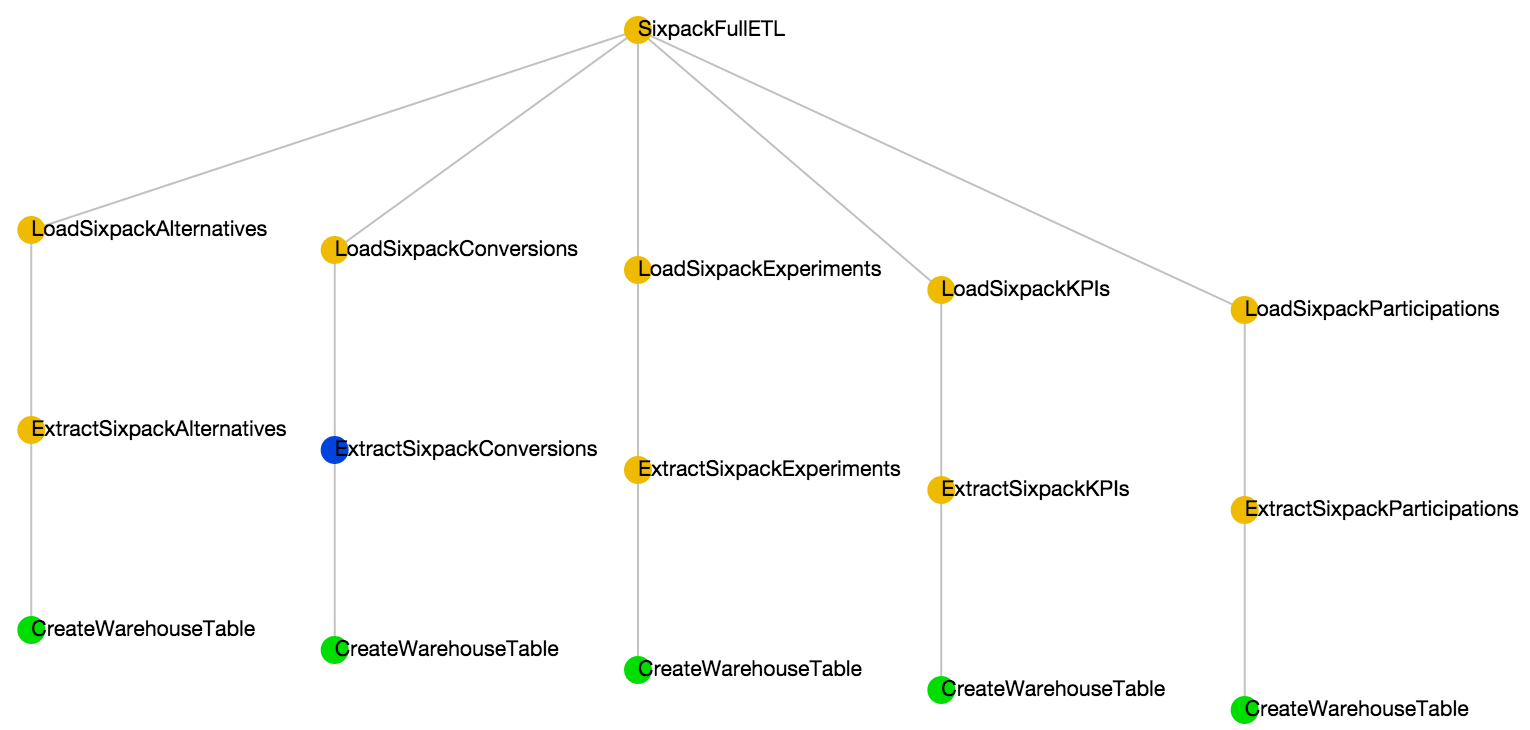
Luigi:Luigi is an open source Python framework created by Spotify for managing data processing jobs. One thing Luigi is really great at is dependency management, which makes it a perfect tool for coalescing together data sources that depend on each other. As stated in its docs, Luigi does not manage time scheduling for tasks. We use our own cron-like service for kicking off a single Luigi task that encapsulates the entire ETL process every night. The dependency chain automatically schedules every incomplete task under that ETL process. This works great for scheduling tasks with simple hierarchies:
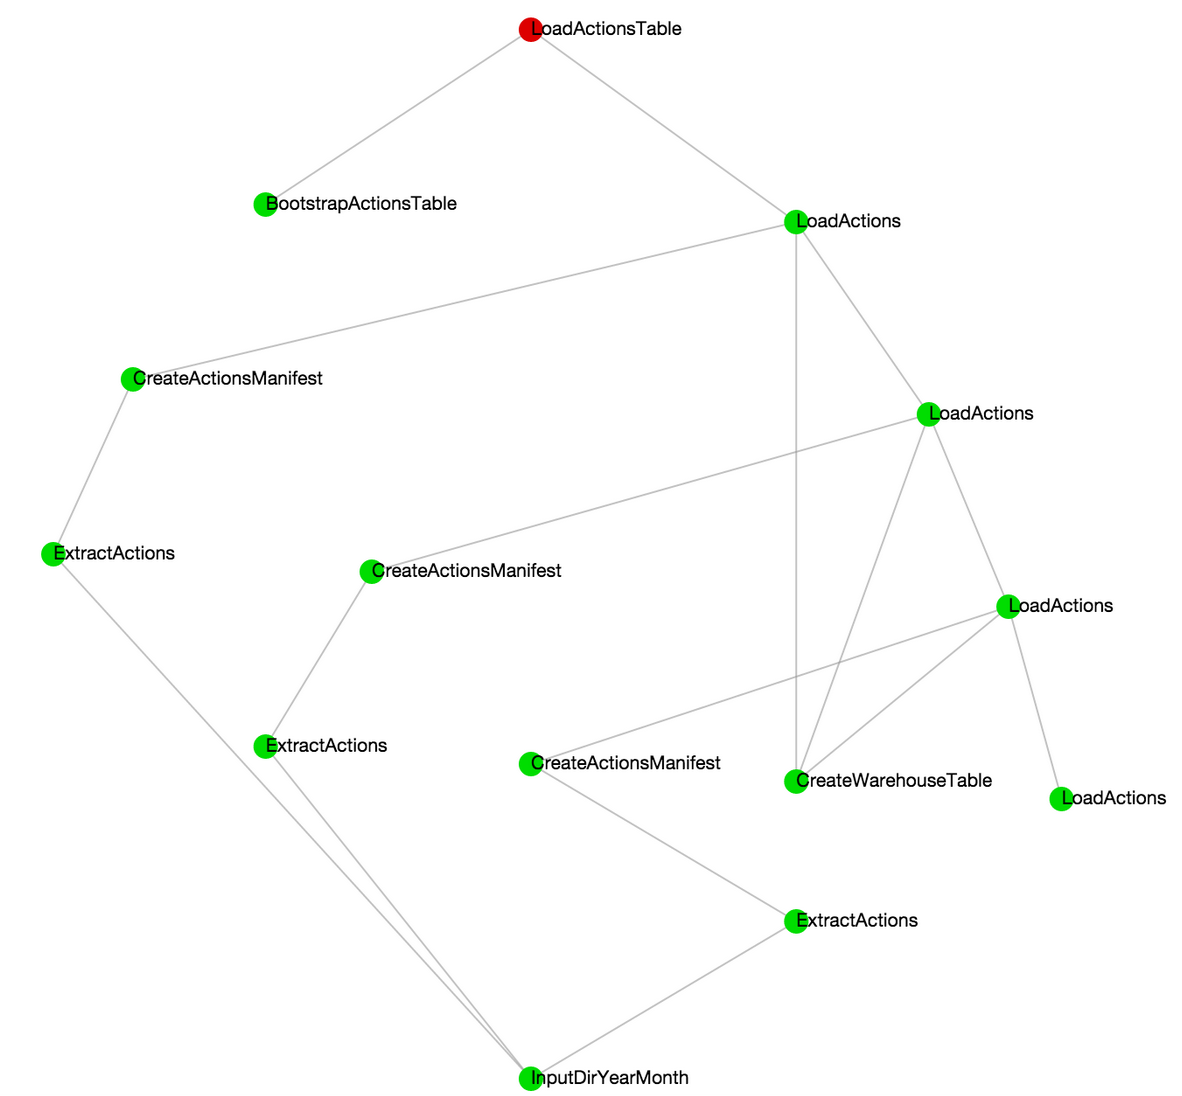
But it also works just as well for tasks with more gnarly dependencies:
We’re happy with some of the basic patterns for ETL tasks we’ve settled on. We wrote our own ETL base classes on top of Luigi’s Task and Target objects that we subclass and customize for our various data sources, as well as helper tasks and targets for working within Redshift and S3. The data-loading method that we’re sticking with currently is to have transformed data written to S3 files and then loaded directly into Redshift tables using Redshift’s manifest files and COPY command. This makes it easy to standardize the data loading process across different sources since most of the customized logic will be written in the extraction / transformation steps. (Side note: for our MySQL data we do things slightly differently; we load the tables exactly as they are into Redshift first before applying any transformations in order to minimize contact with production data).
Luigi’s flexibility makes it easy to fill in the gaps caused by Redshift’s lack of SQL feature parity with PostgreSQL, as well as extend the data pipeline beyond just ETL tasks. As a simple example, it’s common to create something like a date dimension table using a stored SQL procedure, which Redshift doesn’t support. It’s easy to code that date logic in Python though, and encapsulate it within a Luigi task. In this case, rather than extracting from a remote datastore, we just “extract” dates from the calendar and “transform” them into dictionary elements. We can use a (very) simple generator to create these rows:
Then it gets fun! ExtractDateTable inherits “output” from BaseExtractor, which has an abstraction allowing us to write to an atomic manifest of CSV files on S3, ready for loading into a Redshift table.
Using the dependency management provided by Luigi, not only does our BaseLoader know to wait for success of the “Extract” task, but it also knows that the output of ExtractDateTable is the appropriate file to COPY to the data warehouse and that all files can be deleted from S3 as soon as they arrive in Redshift.
This might seem a bit heavyweight for a static table, but with a few key abstractions, creating a new table in our data warehouse has become as simple as writing a Python2 script that outputs a CSV file. Some of this Luigi monkey patching was borne out of necessity, but we actually prefer doing it this way now because it bestows some great benefits. We find it makes it easier to triage data issues when all our data transformations are recorded in a single location and version-controlled, and very powerful to be able to transform our data in any way that’s expressible in Python. Data science at SeatGeek has long involved writing Python scripts that output large CSV files. Having the ability to plug them into a lightning-fast database and an interactive visualization tool? We love it.
‘Looking’ ahead
Since we’re just getting up and running with Looker now, we haven’t been able to play around and explore it fully just yet, but there is definitely more to come. With our basic infrastructure set up though, we’re excited to dig in deeper with our new tools and flesh out our data architecture even further over the next couple of months. If you’re interested in being a part of the journey, we’re hiring data scientists and more!
1. Well, not production, but running against slave we occasionally broke replication.
↩
2. Luigi is agnostic to how the CSVs arrive at their location through its support of ExternalTasks and FileSystemTargets, but in practice we mostly use Python. Python is great.
↩
A browser-ready efficient scrolling container based on UITableView
We’re growing more every day, adding new brokers to our comprehensive list of ticket sources, and expanding our list of event tickets. With this, and our continuing focus on cross-event search, we’re showing more ticket listings to more people than ever before.
The default DOM scrolling implementation is, unfortunately, inefficient. Tens of thousands of DOM nodes that are out of the view of the user are left in the DOM. For cross-event comparisons in particular, this quickly makes the performance of our ticket listings unacceptable.
React Infinite solves this with an approach popularized by iOS’s UITableView. Only DOM nodes that are in view or about to come into view are rendered in full. This makes scrolling performance constant throughout the length of the entire list regardless of the number of items added.
We’re using React Infinite in production on our event map pages right now; because we only have pages for events in the future, a link would not be appropriate. To see one, head to one of our team pages for the New York Giants, or the New York Mets, or the New York Knicks, and click on the green button for an event to see them in action in the Omnibox.
To get you started, here is an example that implements an infinite scrolling list with a simulated loading delay of 2.5 seconds:
For the complete documentation, head over to the Github repo, or download it on NPM with npm install react-infinite or Bower with bower install react-infinite. We hope you’ll be able to use React Infinite in creating a better, faster, and smoother web.
We started SeatGeek nearly five years ago with the goal of helping people enjoy more live entertainment by building great software.
Our goal hasn’t changed, but its scope has. We’ve gone from a team of two to a team of forty. From the desktop web to iOS, Android and mobile web. And from a handful of active users (hi Mom!) to millions.
We think we’re onto something big. And we’ve decided to partner with some exceptional folks to get SeatGeek moving even faster. This past week we closed a $35M Series B round led by Accel Partners, alongside Causeway Media Partners, Mousse Partners, and a number of other great investors (full list here).
From going hoarse screaming for your favorite team, to dancing along with your favorite band, live entertainment is a deeply personal, aesthetic experience. We think the software that enables those moments should be too. We are a technology company. Everyone at SeatGeek is driven to create something elegant, intuitive and useful. This financing gives us one of the tools we need to do that more quickly and for more people than ever before.
The last five years have been a blast. The next five will be even better. We’re going to remain focused on building amazing software that helps people have fun. And we’re excited to partner with Accel and others to help us make it happen.
Last week, you may have noticed that we released a facelift for our interactive maps. Our Deal Score markers have finally been brought up to 2014 design standards to match the Omnibox. However, what may not be as apparent is that our maps are now between 10 and 100 times faster, depending on the device.
Background
This blog post from March gives a good overview of how our maps used to work. Our maps consisted of three different layers: an image tile layer, an SVG layer, and a Leaflet marker layer.
This is how our map used to look. The actual stadium is an image tile, the blue section outline is an SVG layer, and the green dot is a Leaflet marker, an HTML element containing an image. There are a couple drawbacks to this approach…
Performance
While Leaflet markers work well for maps with a small number of markers, we were pushing the limits how many markers could be drawn on the map. At a row-level zoom, we can have thousands of markers on the screen at a given time. Since each marker is an individual DOM element, the browser must move around thousands of DOM elements at the same time when panning and zooming. This meant slow performance on even the fastest of computers and even worse performance on mobile.
Code Complexity
With the addition of section and row shape interactions, our code became incredibly complex. We were listening to mouse events coming from the tile layer, the SVG layer, and the marker layer. This resulted in a mess of code trying to handle every corner case, e.g. we receive a mouseout event from a marker and a mouseover event from the SVG layer.
This is an effective way to reduce the number of DOM elements on screen. Unfortunately, clustering like this does not work for our use case. In our maps, the markers need to be specific to either a row or a section. Marker clusters, which are based only on marker positions, could result in some unintuitive ticket groupings, e.g. a VIP box and the front row of an upper level section. Therefore, we needed to come up with a solution that would maintain the section and row level detail views, while achieving the same performance as marker clusters.
HTML5 Canvas
A few months ago, we made the decision to drop support of Internet Explorer 8. In addition to making every engineer here very happy, this also opened up the possibility of using canvas for our map markers, something we have been looking forward to for a long time.
The HTML5 canvas element is basically a low-level drawing region. It supports basic drawing operations, but does not have the concept of a scene graph or event handling for anything drawn to it. Most importantly for us, modern browsers are incredibly fast at drawing to canvas elements, often using hardware acceleration.
Canvas Tiles
Our plan was to move from using SVG section outlines and Leaflet markers to using tiled canvas elements. This means that instead of forcing the browser to move thousands of DOM elements when panning and zooming the map, we can draw the markers to the canvas tiles once per zoom level and move the canvas tiles themselves around. Browsers are much better at moving 16 elements around on the screen than 2,000.
Here is what the canvas tiles look like (with debugging on) at our lowest zoom level:
And at our highest zoom level:
This is by no means a new idea. Leaflet itself supports basic canvas tiling and some cool things have been done with it. However, using canvas tiles for our purposes presents some very interesting challenges.
Hit Testing
By consolidating the SVG and marker layers into a single canvas tile layer, we were able to greatly consolidate our mouse interaction code. The bounding boxes of the section and row shapes as well as the markers were put into our favorite spatial data structure, the R-Tree, for fast lookup. As markers sometimes extend past the edge of the shape they are in, we first check for marker intersect and then fall back to shape intersect.
Drawing
In order to maintain a high frame rate, we need to make the drawing step as fast as possible. Every time Leaflet requests a tile to be drawn, we calculate the bounding box it covers on the map. Then, we look up what markers fall within that bounding box plus a small buffer, to avoid markers right next to the edge of a tile being clipped. We then iterate through the markers and draw them to the tile. We perform a similar process for drawing hovered and selected shape outlines.
Tile Redrawing
There are a couple of events that cause tiles to need to be drawn or redrawn. On zoom, a new set of canvas tiles are requested and drawn at the correct scale. When a shape is hovered or selected, we also must redraw the tile or tiles that contain it. In order to minimize the number of tiles redrawn, we keep track of a redraw bounding box. Between each redraw, we update the redraw bounding box to contain the shapes that need to be drawn or cleared. Then, when the redraw function gets called, we draw only the tiles that contain the redraw bounding box. Now, we could clear and redraw only parts of each tile, but it turned out we got the performance we were looking for without introducing the extra code complexity of sub-tile redrawing.
Here you can see how the canvas tiles are redrawn. Each redraw colors the updated tiles the same color.
And on mobile.
Buffered Marker Drawing
All was going great until we decided the markers needed a slight drop shadow to help visually separate them from the underlying map. Drawing drop shadows in canvas is notoriously slow. However, drawing images or other canvas elements to a canvas element is quite fast. Therefore, while we are waiting for our tickets to load, we create small canvas elements for every marker color (and at two different sizes, since we enlarge the marker on hover). Then, when we need to draw the markers in the canvas tiles, we can pull from these buffered marker canvases. This way, we only incur the cost of shadow blur once and use the comparatively fast drawImage when performance counts.
Results
Flexibility
As the markers are now procedurally drawn, we can now change their styling whenever we want to. Even the legend is a canvas element that correctly spaces the markers if we change their sizes.
Code Complexity
By switching to canvas markers we were able to greatly reduce the complexity of our event handling code. Probably the best thing to ever see in a GitHub pull request, an overall code decrease.
Performance
The Chrome timeline pretty much sums up the staggering performance increase.
Old map.
New map.
As you can see, the main performance gain comes from greatly reducing the browser rendering time (purple). Across all devices, the maps now stay comfortably over 60fps, inertial panning works smoothly, and our mobile site is considerably more usable.
If this type of stuff gets you excited, we are always looking for engineers. Come join us!
A flexible image caching library for image rich iOS applications
Our iOS app is image rich. To create appealing views we rely
heavily on performer images, all of which must first be fetched from a remote server. If each
image needed to be fetched from the server again every time you opened the app, the experience
wouldn’t be great, so local caching of remote images is a must.
Version 1 - Ask for an image, get it from disk
Our first image cache was simple but effective. For each image view we’d ask for an
image from cache, using its remote URL as the cache key. If it was available in the local
disk cache a UIImage would be created from the file on disk, and returned immediately. If
it wasn’t found on disk it would be fetched async from the remote URL, cached to disk, then a
new UIImage returned.
For our purposes at the time this was perfectly adequate. But it had one point of unnecessary
weakness: each cache request required the image to be loaded again from disk, which
comes with the performance cost of disk access and image data decoding.
Version 2 - Memory caching
Thankfully Apple’s UIImage has a built in memory cache. So by changing a single line of code
our image cache could go from being a disk only cache to a disk and memory cache.
When you ask UIImage for an image via imageNamed: it first checks its own memory cache
to see if the image has been loaded recently. If so, you get a new UIImage at zero cost. So
instead of something like this:
UIImage will search its memory cache and, if found, return the image at no cost. If it
isn’t in the memory cache it will be loaded from disk, with the usual performance penalty.
Version 3 - Fetch queues, prefetching, and variable urgency
As the design of our app evolved we became increasingly image greedy, wanting to show richer,
larger images, and more of them.
Getting these larger images on screen as quickly as possible is critical to the experience,
and simply asking the cache for each image at display time wasn’t going to cut it. Larger
images take longer to load over the network, and asking for too many at once will result in
none of them loading until it’s too late. Careful consideration of when the image cache is
checked and when images are fetched from remote was needed. We wanted precaching and fetch
queues.
fastQueue and slowQueue
We settled on two queues, one serial and one parallel. Images that are required on screen
urgently go into the parallel queue (fastQueue), and images that we’ll probably need later
go into the serial queue (slowQueue).
In terms of a UITableView implementation, this means that a table cell appearing on screen
asks for its image from fastQueue, and every off screen row’s image is prefetched by adding
it to slowQueue.
We’ll need it later
Assuming we request a page of 30 new events from the server, once those results arrive
we can queue up prefetching for each of their images.
The slowGetImageForURL: method adds the image fetch to slowQueue, allowing them to be
fetched one by one, without bogging down the network.
The thenDo: completion block is empty in this case because we don’t need to do anything with
the image yet. All we want is to make sure it’s in the local disk cache, ready for immediate
use once its table cell scrolls onto screen.
We need it now
Cells that are appearing on screen want their images immediately. So in the table cell
subclass:
The getImageForURL: method adds the image fetch to fastQueue, which means it will be
done in parallel, as soon as iOS allows. If the image was already in slowQueue it will be
moved to fastQueue, to avoid wasteful duplicate requests.
Always async
But wait, isn’t getImageForURL: an async method? If you know the image is already in cache,
don’t you want to use it immediately, on the main thread? Turns out the intuitive answer to
that is wrong.
Loading images from disk is expensive, and so is image decompression. Table cells are
configured and added while the user is scrolling the table, and the last thing you want to
do while scrolling is risk blocking the main thread. Stutters will happen.
Using getImageForURL: takes the disk loading off the main thread, so that when the thenDo:
block fires it has a UIImage instance all ready to go, without risk of scroll stutters. If
the image was already in the local cache then the completion block will fire on the next run
cycle, and the user won’t notice the difference. What they will notice is that scrolling
didn’t stutter.
Thought we needed it but now we don’t
If the user scrolls quickly down a table, tens or hundreds of cells will appear on screen, ask
for an image from fastQueue, then disappear off screen. Suddenly the parallel queue is
flooding the network with requests for images that are no longer needed. When the user finally
stops scrolling, the cells that settle into view will have their image requests backed up
behind tens of other non urgent requests and the network will be choked. The user will be
staring at a screen full of placeholders while the cache diligently fetches a backlog of
images that no one is looking at.
This is where moveTaskToSlowQueueForURL: comes in.
12345678
// a table cell is going off screen-(void)tableView:(UITableView*)tabledidEndDisplayingCell:(UITableViewCell*)cellforRowAtIndexPath:(NSIndexPath*)indexPath{// we don't need it right now, so move it to the slow queue [SGImageCachemoveTaskToSlowQueueForURL:[[(id)cellevent]imageURL]];}
This ensures that the only fetch tasks on fastQueue are ones that genuinely need to be
fast. Anything that was urgent but now isn’t gets moved to slowQueue.
Priorities and Options
There are already quite a few iOS image cache libraries out there. Some of them are highly
technical and many of them offer a range of flexible features. Ours is neither highly
technical nor does it have many features. For our uses we had three basic priorities:
Priority 1: The best possible frame rate
Many libraries focus heavily on this, with some employing highly custom and complex
approaches, though benchmarks don’t show conclusively that the efforts have paid off. We’ve
found that getting the best frame rates is all about:
Moving disk access (and almost everything else) off the main thread.
Using UIImage’s memory cache to avoid unnecessary disk access and decompression.
Priority 2: Getting the most vital images on screen first
Most libraries consider queue management to be someone else’s concern. For our app it’s almost
the most important detail.
Getting the right images on screen at the right time boils down to a simple question: “Do I
need it now or later?” Images that are needed right now get loaded in parallel, and everything
else is added to the serial queue. Anything that was urgent but now isn’t gets shunted from
fastQueue to slowQueue. And while fastQueue is active, slowQueue is suspended.
This gives urgently required images exclusive access to the network, while also ensuring that
when a non urgent image later becomes urgently needed, it’s already in the cache, ready to go.
Priority 3: An API that’s as simple as possible
Most libraries get this right. Many provide UIImageView categories for hiding away the
gritty details, and most make the process of fetching an image as painless as possible. For
our library we settled on three main methods, for the three things we’re regularly doing:
By focusing on prefetching, queue management, moving expensive tasks off the main thread, and
relying on UIImage’s built in memory cache, we’ve managed to get great results in a simple
package.
The SeatGeek Platform provides a web service for our
massive database of live events, venues, and performers. If you want to build live event
information into your app or website the SeatGeek Platform is the best way to do it. Until
now, if you wanted to use it in an iOS app you had to handle all of the awkward network
requests and response processing yourself. With today’s release we’ve made that a whole lot
easier.
Since the first release of our iOS app we’ve been gradually
evolving a handful of libraries to manage communicating with our API, progressively
abstracting away the messy details so we can focus on writing features. Today’s CocoaPod
release is that code, in the same form as we use it ourselves.
The first line in our app’s Podfile is:
pod 'SGAPI'
Fetching and Inspecting Results
The SeatGeek Platform is all about events, venues, and performers, so the same is true of the
iOS SDK. Individual result items are encapsulated in SGEvent, SGVenue, and SGPerformer objects, and query
result sets are fetched with SGEventSet, SGVenueSet, and
SGPerformerSet objects.
Objective-C
1234567891011
// find all 'new york mets' eventsSGEventSet*events=SGEventSet.eventsSet;events.query.search=@"new york mets";events.onPageLoaded=^(NSOrderedSet*results){for(SGEvent*eventinresults){NSLog(@"event: %@",event.title);}};[eventsfetchNextPage];
Swift
123456789101112
// find all 'new york mets' eventsletevents=SGEventSet.eventsSet()events.query.search="new york mets"events.onPageLoaded={resultsinforiin0..<results.count{letevent=results.objectAtIndex(i)asSGEventNSLog("%@",event.title())}}events.fetchNextPage()
Output
New York Mets at San Diego Padres
New York Mets at Seattle Mariners
... etc
Query Building
SGAPI uses SGQuery to build
all its URLs. If you’d prefer to use your own data models or HTTP request classes and just
want a tidy way to build API queries, then SGQuery is what you’re looking for.
See the documentation on GitHub and
CocoaDocs for more details. If anything doesn’t
make sense or could be improved, let us know. We’ll be evolving the SDK over time, and are
looking forward to seeing how you make use of it!
A few months ago we launched the Omnibox, a single reconfigurable ticket-buying interface that replaced our old static listings and a thicket of popup windows. The Omnibox is written entirely in React, Facebook’s new user interface framework, and in doing this we had to come up with our own solutions to user interface elements and innovate where we could.
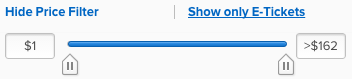
One of the products of our work on the Omnibox was a price slider component, which allows users to filter tickets by price:
But for an event with large price ranges - the Super Bowl, for example - a simple linear slider would be unwieldy. Tickets are likely sparsely populated across the full domain of prices and, more importantly, users are far more interested in lower-priced tickets than the exorbitantly priced ones.
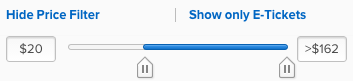
We solved this problem with two features of the slider: firstly, the upper limit of the price slider was truncated to the 90th percentile of ticket prices, and only dragging the slider handle to its right end will reveal all tickets greater than that price:
Secondly, the slider’s scale is no longer assumed to be linear. The implementation currently deployed on the SeatGeek site positions the slider on the horizontal axis using the square root function, making lower prices take up more space than the less-desirable higher-priced tickets.
The first version of the SeatGeek Dev Challenge. Crack open the beers.
In a land before time, SeatGeek created an extremely hackable admin panel. Its primary purpose was to stir the curiosity of developers who might be looking for a new job. You can read more about it in this previous post.
While the response over the years to the dev challenge was great, we retired the dev challenge over a year ago. Please stop trying to hack into our backend! (If you do happen to be hacking our website, we’d appreciate a heads-up on any vulnerabilities you find at hi@seatgeek.com Responsible disclosure and whatnot.
In order to cater to the curious, I took the opportunity to open source the dev challenge. It’s a small Sinatra app that you can run locally and hack to your heart’s content.
A few notes about the panel:
Configuration is done using environment variables with a few sane defaults.
You’ll need a local SMTP server to send email notifications of new applicants. We used postfix at the time, but you can use whatever you’d like.
Applicant resumes are stored on disk. Yes, we know, there are probably better ways than what we did, but since the box was in a DMZ, it was probably okay. Not like we weren’t trying to have you hack us anyhow.
Ruby 1.9.3 is what we used to deploy—actually 1.9.1 at the time, but it works with 1.9.3—but no guarantees that it will work with a newer Ruby. Pull requests welcome!
We’d like to thank all the thousands of developers who have hacked our backend over the years. Don’t worry, we’ll have a new challenge soon.