Builds a service with docker and caches the intermediate stages
At SeatGeek we use Multi-stage Dockerfiles to build the container images
that we deploy to production. We have found them to be a great and simple way of building projects with dependencies in different languages or tools.
If you are not familiar with multi-stage Dockerfiles, we recommend you take a look at this blog post.
In our first days of using them in our build pipeline, we found a few shortcomings that were making our deploys take longer than they should have. We traced
these shortcomings to a missing key feature: It is not possible to carry statically generated cache files from one build to another
once certain source files in the project change.
For example when building our frontend pipeline we have to invoke yarn first to get all the npm packages. But this command can only be executed after
adding the yarn.lock and package.json files to the Docker container. Because of the nature of how Docker caching works, this meant that each time those
files are modified, the node_modules folder cached in previous built was also trashed. As you may already know, building that folder from scratch is not
a cheap operation.
Here’s an example that illustrates the issue.
Imagine you create a generic Dockerfile for building node projects
1234567891011121314
FROM nodejs

RUN apt-get install nodejs yarn

WORKDIR /app

# Whenever this image is used execute these triggers
ONBUILD ADD package.json yarn.lock .

# Dowanload npm packages
ONBUILD RUN yarn

# Build the assets pipeline
ONBUILD RUN yarn run dist
We can now build and tag a Docker image with for building yarn based projects
1
docker build -t nodejs-build .
The tagged image can be used in a generic way like this:
1234567891011
# Automatically build yarn dependenciesFROM nodejs-build as nodedeps
# Build the final container imageFROM scratch
# Copy the generated app.js from yarn run distCOPY --from=nodedeps /app/app.js .
# Rest of the Dockerfile...
So far so good, we have build a pretty lean docker image that discards the node_modules
folder and only keeps the final artifact. For example a set of js bundles from a React application.
It’s also very fast to build! This is because each individual step is cleverly cached by Docker during
the build processes. That is, as long as none of the steps or files used in the step have changed.
And that’s exactly where the problem is: Whenever the package.json or yarn.lock files change, Docker
will trash all the files in node_modules directory as well as the cached yarn packages and will start downloading
from scratch, linking and building every single dependency.
That’s far from ideal, as it takes significant time to rebuild all dependencies. What if we could make a change to the
process so that changes to those files do not bust the yarn cache? It turns out we can!
Enter docker-build-cacher`
We have built a slim utility that helps overcome the problem by providing a way to build the Dockerfile
and cache all of the intermediate stages. On subsequent builds, it will make sure that the static cache
files that were generated during previous builds will also be present.
The effect it has should be obvious: your builds will be consistently fast, at the cost of a bit of extra disk space.
Building and caching is done in separate steps. The first step is a replacement for the docker build command and
the second step is the cache persisting phase.
123456
export APP_NAME=fancyapp
export GIT_BRANCH=master # Used to internally tag cache artifactsexport DOCKER_TAG=fancyapp:latest
docker-build-cacher build # This will build the docker filedocker-build-cacher cache # This will cache each of the stage results separately
How It Works
The docker-build-cacher tool works by parsing the Dockerfile and extracting COPY or ADD instructions nested
inside ONBUILD for each of the stages found in the file.
It will compare the source files present in such COPY or ADD instructions to check for changes. If it detects changes,
it rewrites the Dockerfile on the fly, such that FROM directives in each of the stages use the locally cached images instead
of the original base image.
The effect this FROM swap has is that disk state for the image is preserved between builds.
Disaster Recovery and Configuration Management for Consul and Vault
This post is the first of a bonus series on tooling for the Hashi-stack - Consul, Nomad, Vault. We also recommend our previous series on using Vault in production.
Configuration Management for your Configuration
In our initial Vault rollout, one pain-point we quickly came across was managing Consul and Vault configuration. We use both Hashicorp tools for managing secrets and access control across our entire infrastructure, and knowing what configuration was setup where in each cluster is quite critical. On top of this, disaster recovery quickly became an issue we knew we needed to tackle before a more broad roll-out.
One of our Systems Engineers started looking at what our needs were in regards to properly managing Consul and Vault configuration, and came up with a wonderful workflow through the use of a tool we like to call hashi-helper. We use hashi-helper internally to manage multiple clusters in different environments via a git repository that contains our canonical configuration. It is now pretty trivial for us to:
Standup a vault cluster using our normal provisioning toolchain.
Unseal vault via gpg key via the normal vault tooling, or keybase via hashi-helper vault-unseal-keybase.
Provision mounts, policies, and secrets using hashi-helper vault-push-all.
Provision custom registered consul services via hashi-helper consul-push-services.
Manage all of our configuration via either blackbox gpg-encrypted files or AWS KMS encryption through tooling such as sm.
Example Workflow
For those curious about what a typical workflow might look like, the following directory structure may be suitable for a typical organization with a Consul/Vault cluster per-environment:
/${env}/apps/${app}.hcl (encrypted) Vault secrets for an application in a specific environment.
/${env}/auth/${name}.hcl (encrypted) Vault auth backends for an specific environment ${env}.
/${env}/consul_services/${type}.hcl (cleartext) List of static Consul services that should be made available in an specific environment ${env}.
/${env}/databases/${name}/_mount.hcl (encrypted) Vault secret backend configuration for an specific mount ${name} in ${env}.
/${env}/databases/${name}/*.hcl (cleartext) Vault secret backend configuration for a specific Vault role belonging to mount ${name} in ${env}.
Here is an example for managing Vault Secrets:
12345678910111213141516171819
# environment name must match the directory name
environment "production" {

  # application name must match the file name
  application "XXXX" {

    # Vault policy granting any user with policy XXXX-read-only read+list access to all secrets
    policy "XXXX-read-only" {
      path "secret/XXXX/*" {
        capabilities = ["read", "list"]
      }
    }

    # an sample secret, will be written to secrets/XXXX/API_URL in Vault
    secret "API_URL" {
      value = "http://localhost:8181"
    }
  }
}
We believe that modern technology can be a force for good in live entertainment. That’s why we created SeatGeek Open – a platform which enables teams, artists, and fans to buy and sell tickets across the open web. Openness means harnessing the power of the internet to create better experiences.
In order to launch SeatGeek Open last August, we needed to find a partner that shared our vision, and whose powerful box office technology would enable a true API-driven entertainment platform. We did an exhaustive worldwide search, but in the end the selection of Israel-based TopTix was remarkably clear and unequivocal. They brought unprecedented technology and incredible talent to SeatGeek Open.
Today, we’re over-the-moon excited to announce that TopTix is joining SeatGeek.
TopTix was started in 2000 in Karmiel, Israel by two remarkable entrepreneurs, Eli Dagan and Yehuda Yuval. Since then, they’ve grown to 115 employees across four continents. As we’ve gotten to know the people at TopTix, we’ve been struck by how similar they are to the people at SeatGeek – bright, humble, and driven by a core belief in the transformative power of technology. We couldn’t be more stoked that this extraordinary group is now part of our team.
TopTix’s primary ticketing platform, called SRO, is by far the strongest and most modern backend ticketing platform on earth. It serves more than 500 venues, and processes over 80 million tickets a year in 16 countries across the globe. Current TopTix clients range from museums and theaters to festivals and sports teams, including well-known organizations such as the Ravinia Festival, the Royal Dutch Football Association, West End theaters, and several English Premier League clubs.
We’re excited to continue to support all current TopTix clients from TopTix’s seven global offices. The TopTix engineering team will remain 100% focused on SRO, working to further extend the platform with all of SeatGeek’s resources now behind them.
We believe the future of ticketing is open. Openness means enabling teams and venues to fill their venues. Most importantly, it means making fans happier.
Joining forces with TopTix will allow us to make SeatGeek Open an even more powerful platform and to create more great experiences for fans. SeatGeek and TopTix have already helped Sporting Kansas City, our first client, sell more tickets and reach new fans, while giving supporters easy access to the games they love. Now that we’re officially operating as one, we’re feverishly excited about the potential this unlocks and our future together as a single united company.
This post is the second of a two-part series on using Vault in production. Both posts are slightly redacted forms of internal documentation. This post covers day-to-day usage of Vault, while the previous post covered our specific workflow.
Please note that some of the referenced tooling is not currently publicly available.
Not all of our practices will apply to your situation, and there are cases certainly where our setup may be suboptimal for your environment.
Using Vault
This is the tl;dr you were looking for…
For Developers
Developers should expect credentials to live in environment variables that can be loaded into an app when needed. These credential names are specified within an app.json manifest file, and Ops should be contacted to place their values in Vault. The deploy process currently uses the vault api to retrieve appropriate credentials for a service, transparent to the development staff.
The basic flow for reading or writing credentials is the following:
Login to Vault and receive a token
Make a request with the token to read or write
Schema
Secrets accordingly to the following convention:
1
secret/ENVIRONMENT/APP/KEY value=VALUE
Login
Note: Developer Vault logins require a Github Access Token (https://github.com/blog/1509-personal-api-tokens)
vault init is used to bootstrap a new Vault cluster. This generates a number of keys and requires a majority threshold of these keys in order to unseal Vault (more on unsealing below).
For SeatGeek’s Vault cluster, vault init has been run as follows:
Note: Local public key files can also submitted for the pgp-keys option
Initializing Vault this way leverages its support for authorizing users to be able to unseal Vault via their private GPG keys. This method was chosen as we already using blackbox to encrypt secrets within certain repositories.
When vault is initialized, an unseal tokens are printed out for each pgp key specified. The order of these keys matches the order in which the pgp keys were specified, and each can only be decrypted by the corresponding pgp key. Those unseal tokens should be securely distributed to the corresponding operations engineer and stored in a secure fashion. Loss of keys exceeding the threshold will result in a loss of ability to unseal the cluster.
Vault should only need to be reinitialized if all of the data in lost, which for SeatGeek would be in a loss of the Consul Cluster.
Unsealing
Vault boots up in a sealed state, and in this state no requests are answered. Each machine within a Vault cluster can be in a sealed or active state, and all must be unsealed before answering any requests. There is also a standby state, in which the machine is unsealed but not primary, and is ready for failover if the currently active primary dies.
A Vault machine can be unsealed via the following command:
The VAULT_UNSEAL_KEY is specific to each user who was specified in the vault init command. All unseal keys were distributed at the time of initialization.
Note: This requires having the vault binary installed locally.
Root Token
An initial root token is created when the Vault Cluster is initialized. Other root tokens are created from this token, and as such, if a root token is needed it must be created by an existing holder of a root token.
A new root token can be created from an existing root token via the following command:
Note: You must be logged in with a root token in order to run this command
In the emergency case that a new root token needs to be created, the following command can be run:
1
vault generate-root
This operation requires a majority of unseal key holders to execute.
Note: At this time of writing, Vault 0.6.2 has deprecated this workflow surrounding root tokens and our usage is subject to change in the future.
Provisiong a New Service
When provisioning a new service, secrets can simply be written to the appropriate bucket (secret/ENVIRONMENT/APP_NAME/KEY value=VALUE). Everything under secret/ is a “key” and all necessary paths will be created.
Whitelisting a New Service
On first boot of infrastructure, the Jenkins Whitelist deploy job, a dependency of the Jenkins Configure job, will be run. If not already, the new application will be created and its corresponding IAM Role will be whitelisted. This job also ensures all other IAM Role whitelists are up to date in Vault.
To ensure that Jenkins has the correct permissions, a special role allowing it access to write auth and policy documents should be written to Vault. The following can be used to create the policy, which is stored with all other custom vault policies:
Policies must be audited on a regular basis, consistent with all other internal auditing processes.
When used in contexts that do not easily support passing roles, you can create a vault token for this or any policy. The following creates a renewable token that is valid for 60 seconds:
The vault rekey command allows for the recreation of unseal keys as well as changing the number of key shares and key threshold. This is useful for adding or removing Vault admins.
The vault rotate command is used to change the encryption key used by Vault. This does not require anything other than a root token. Vault will continue to stay online and responsive during a rotate operation.
Disaster Response
In the case of an emergency, Vault should be sealed immediately via:
1
vault seal
This will prevent any actions or requests to be performed against the Vault server, and gives time to investigate the cause of the issue and an appropriate solution.
A secret stored in Vault is leaked
A new secret should be generated and replaced in Vault, with a key rotation following.
Vault user credentials are leaked
The user credentials should be revoked and a key rotation should be performed.
Vault unseal keys are leaked
A rekey should be performed.
A common task when working in server infrastructure is to take inventory of what is available.
This can be useful for figuring out what is out of date, when certain pieces were introduced to
your environment, or even taking stock of what items might be hidden that you otherwise were
not aware of.
For AWS users, there are a dozen ways to inspect your infrastructure:
Early on in SeatGeek’s history, we relied heavily on the AWS API to figure out what ec2
instances were available in our infrastructure for the purposes of service discovery. As we
grew in both traffic and footprint, this became unwieldy, and suffered from rate-limiting
issues, retry bugs, and general auth errors across the various utilities that interacted
with the AWS API. Thus was born haldane, a friendly http interface to the AWS API.
SeatGeek uses haldane to expose a simple http interface to the AWS API which can be
easily integrated into our toolchain. Here is an example haldane query:
The following are a few of the resources exposed via haldane:
/amis: Corresponding to AWS EC2 AMIs
/instances: Corresponding to AWS EC2 Instances
/instance-types: Corresponding to available AWS EC2 Instance Types
/rds-instances: Corresponding to AWS RDS Instances
Under the hood, haldane queries the AWS API using Boto3, and caches the resultset in memory
for a configurable amount of time. This ensures relatively fresh data from AWS, while reducing
the probability of hitting the AWS rate-limit.
In the time since we initially developed haldane, SeatGeek has seen explosive growth, and
it is no longer a solution we can depend upon for server discovery at scale. That said, it can
be very useful for any of the following use-cases:
Static infrastructure
Generating CSV reports
Querying for outdated resources
Inspecting the state of small clusters
Retrieving the IP address of a random instance in a cluster
Internally, we’ve built a few such tools to support infrastructure spelunking, and while we
may not rely on it as heavily as we used to, we hope that others can find utility in using haldane.
You can find haldane on Github, under the BSD 3-Clause License.
by Jeff Ianello, EVP, SeatGeek Open Partnerships at SeatGeek. After more than a decade spent working on the team and league side of sports business, Jeff joined SeatGeek to help build the future of live event ticketing.
It’s five minutes until tipoff of a sold out game when my phone rings. If you’ve ever worked in a box office, you know that a phone call right before tipoff is never a good thing. If you haven’t, I can tell you that it almost always means there’s a problem.
All too often, that problem is that fans are walking up to customer service to tell them that their tickets couldn’t scan. They purchased from one of the largest ticket marketplaces in the world, but one who wasn’t partnered with our team. We explored further and found that these tickets were double sold. In some cases, the seller intentionally defrauded users by intentionally pushing the same ticket to multiple markets. Other times, it was merely an accident or a misunderstanding of marketplace policies.
Either way, the buyers got the short end of the stick. We received angry emails the next day from the fans who couldn’t get in. Twitter was ablaze. The fans’ feelings about our club, of whom they are lifelong supporters, were tarnished. On what should have been one of the most exciting nights of the year, I was left frustrated as an executive.
When I led ticketing for the Phoenix Suns, this was an altogether too familiar experience. In a 19,000 person building, only a handful of double sold tickets may occur each game, but when it happens, a fan’s night can be ruined. Even when marketplaces such as SeatGeek and StubHub provide replacements, some of the magic of the experience is lost and both the team and marketplace’s brands can be damaged. More importantly, the prospect of a bad experience looms the next time that fan thinks about buying a ticket. Will this be the one percent chance where the tickets won’t work? This friction causes some fans not to buy tickets. When that happens, we all lose.
After the Suns, I joined the NBA league office where I worked closely with every team’s ticketing department. The NBA, like other leagues, has multiple primary ticketing companies. Each primary ticketing company has their own “preferred” secondary site. Spectra and AXS partner with StubHub, Ticketmaster owns their own resale, and Veritix uses Flash Seats. Each “preferred” reseller carries “verified” tickets. When a customer buys through one of these preferred platforms, a new barcode is created. The old barcode is no longer valid, while the new one guarantees entry.
What I didn’t learn, but what I realized when I came to SeatGeek, is that none of this has to happen in an age of APIs. APIs are the glue that hold networks together; the way that information systems talk to one another to perform functions such as displaying airfares on travel sites, processing online credit card payments, or in this case, re-issuing a barcode when someone buys a resale ticket. All the legacy ticketing company has to do is expose this functionality to more than one party.
This led me to a realization even more insidious. Ticketing companies want fraud. It is only the existence of unverified tickets that makes verified tickets a valuable asset. Barcode verification can help prop up a ticketing company’s exchange or be an asset that can be sold for millions of dollars to the highest bidder. That status quo benefits ticketing companies at the expense of fans, marketplaces, and teams. They can’t keep that secret any longer.
As I talk to colleagues around the industry, there’s a growing frustration that barcode validation is being held hostage as a way to extract money. I expect in the next three years, the pendulum will swing the other way. Leagues will mandate that all barcodes must be re-issued across every site. Fans are the lifeblood of teams. Why would a team or league want their fans to buy fraudulent tickets when it is completely avoidable?
The time has come for teams and leagues to stand up for fans and demand that primary ticketing companies give up the fabricated spectre of unverified tickets. Instead, by making use of readily available technology to verify tickets for fans – regardless of where the purchase was made – we can all help ensure that when the lights go down, or the team steps out on the court, fans who’ve put their dollar down are there to enjoy the show.
Great technology at SeatGeek helps us give fans as much information as possible before making a purchase. Features such as Deal Score, which ranks tickets by quality in addition to price, and our interactive maps, which are detailed beyond any others in the industry, make the ticket-buying experience easy by giving customers a full understanding of what they are purchasing upfront. Today we’re thrilled to launch Pano, a new product feature that offers the absolute best way for fans to check out what their view at an event will look like before purchasing a ticket.
Pano is an immersive stadium experience that allows fans to digitally interact with and explore a venue. Built in partnership with our first primary ticketing client, Sporting Kansas City, Pano allows fans to see the view of the SKC field at Children’s Mercy Park from every section in the stadium. It offers full 360-degree views from each vantage point and the ability to click around the venue to “fly over” to a different area of the stadium and compare another view.
To build Pano, our team took photos from hundreds of locations around Children’s Mercy Park and used them to create a digital model of the venue. From those flat images, software helped us understand the depth of the images in a way that would truly represent each view and be most helpful to fans. Essentially, we created a three-dimensional world using photos of the stadium, which allows the customer to easily navigate and compare views from all across the venue.
The result is a much more immersive, and more realistic, experience than you see anywhere else on the market. It has the power to take all of the guesswork out of the process of buying a ticket, and is a powerful tool that enables fans to truly experience what they’re buying before they purchase.
This past summer, we launched SeatGeek Open, our vision for the future of ticketing. Like everything we do at SeatGeek, each piece of Open that’s being built has the fan experience in mind, from barcode verification that can eliminate fraud, to elegant APIs allowing for smooth ticket-buying integrations within fans’ favorite websites and apps. Expect to see additional venues released under Pano for future SeatGeek Open clients.
Stay tuned for a more technical look at the behind-the-scenes development of Pano.
Making SeatGeek a great place to work is serious business for our team, and it’s one of the things we’re most proud of as a company. We’re thrilled that Glassdoor has recognized us as one of the top five Best Places to Work in 2017.
The best thing about being included on the Glassdoor list may be that unlike some other, similar awards, there was no self-nomination process. Instead, it’s entirely based on feedback SeatGeek employees have voluntarily and anonymously shared as company reviews on Glassdoor over the past year.
Being part of the SeatGeek team has its perks. We frequently hold team outings and organize an annual retreat, our kitchen is fully stocked with more snacks and caffeine than most humans can handle, and a monthly ticket stipend helps employees attend the best live events New York City has to offer.
But while those perks are fantastic and make working at SeatGeek fun, what we’re really proud of - and believe is more unique - is that SeatGeek is an amazing place to contribute, grow, and build something special. There’s a belief here in the power of live entertainment to improve lives and make people happier, and a genuine passion for building a product that enables great experiences.
As the team continues to grow, we’re fortunate to have found people that continue to embody SeatGeek’s company values. Just as our product encourages transparency to our users - in the form of things like Deal Score, which labels listings as both good values as well as bad - we value and practice transparency internally, by doing things such as presenting board meeting decks to employees, regularly requesting feedback on company performance, and communicating company news early and often.
While we operate in ticketing, SeatGeek is first and foremost a technology company, and our work reflects that. People at SeatGeek love to build things, and we leverage technology to do so faster and better. While our competitors see technology as a disturbance and a challenge to overcome, we embrace it as our competitive edge. An obsession with quality - every pixel, every line of copy, every customer interaction - makes the difference between good and amazing.
The people at SeatGeek that bring these values to life are our most valuable asset, and are what we hear about most often when employees talk about their favorite parts of working here. Feel free to browse examples of the feedback those employees shared on Glassdoor about what it’s like to work at SeatGeek.
If this sounds interesting to you, come work with us at SeatGeek! We have a number of roles open across engineering, marketing, business development, and more.
This post is the first of a two-part series on using Vault in production. Both posts are slightly redacted forms of internal documentation. This post will cover why we chose our specific workflow, and the second post will cover day-to-day usage of Vault.
Problems
Sensitive credentials and keys are stored in certain code repositories (Github).
Anyone with access to Github has access to these credentials.
Anyone who has checked out code has these sensitive credentials on their hard drive.
Key rollovers are a very difficult, manual process.
Sensitive credentials and keys are stored in plain text.
Anyone who can see these credentials can use them.
Shared credentials and keys are used in numerous places.
Generating a meaningful audit log is difficult.
Goals
Encrypt sensitive credentials and keys at rest.
Store sensitive credentials and keys in a central, remote, network accessible location.
Gate and audit access to sensitive credentials and keys.
Provide a unique identifier to each user/agent (per auditing purposes).
By leveraging Vault, we can meet all of our goals.
1. Encrypt sensitive credentials and keys at rest.
Vault encrypts data all stored data at rest.
2. Store sensitive credentials and keys in a central, remote, network accessible location.
Vault is a highly available secret management solution that is network accessible via its HTTP API or via running a local client.
3. Gate and audit access to sensitive credentials and keys.
4. Provide a unique identifier to each user/agent (per auditing purposes).
Vault allows for per user, per machine, or per app credentials controlling access as granularly as needed or desired. In addition, all requests and key usages are recorded in Vault’s logs or syslog which can be shipped to a centralized logging solution.
Implementation Strategy
While Vault provides the primitives and tools, we still need to form a process that understands and works with SeatGeek both now and in the future. With encryption and auditing handled, our job is to store and provide access to secrets as well as manage tokens.
NOTE: The following assumes knowledge about specific Vault features, general AWS knowledge, and SeatGeek’s Base AMI.
Storing Secrets
At SeatGeek (and most other software shops), the two most common types of secrets are the following:
Per Enviroment
This includes secrets that the same for every machine or application, but differ based on the current environment. They are also commonly or can be used by all machines or applications, which is important to note.
Examples: New Relic, PagerDuty
Per Application
This includes secrets that differ between applications, where an application is the combination of itself and the environment in which in runs. This also includes secrets that are not common to every application, regardless if one value is always used.
The reasons for using this backend are simplicity and flexibilty. It allows for arbitrary key-value pairs to be stored, encrypted, and retrieved from Vault without the need or use of third party services.
The generic secret backend allows for key-value pairs to be written under the namespace secret, and can be associated with various ACL’s. The currently used schema is of the following form:
1
secret/ENVIRONMENT/APP/KEY value=VALUE
Here, the top level under the secret namespace is ENVIRONMENT, with each APP getting its own bucket per ENVIRONMENT in which KEYs are written. Vault KEYs can contain a dictionary of key-value pairs themselves, and so the secret VALUE is written to the key value.
NOTE: bucket == namespace
The following environments exist:
1234
production
staging
management
test
Each app will have a bucket created when it is configured to launch in a given environment. Additionally, for our per environment secrets there is a common bucket under each ENVIRONMENT namespace.
Examples of secrets in the wild:
12
Staging New Relic key
secret/staging/common/NEW_RELIC value=THISITHEKEY
12
Production API Spreedly Token
secret/production/api/SPREEDLY_TOKEN value=THISISTHETOKEN
Accessing Secrets
The basic premise here is a client authenticates and is granted a token. That token, among other things, is associated with a role and corresponding set of authorizations in the form of policies or permissions.
Authentication
At SeatGeek (for the time being), there are two Vault clients we need to worry about:
Developers
These are people who write code at SeatGeek. Developers should be granted enough access to be able to do their jobs while keeping our sensitive information secure and our applications running.
Machines
These includes any servers running with SeatGeek infrastructure. Machines should be able to self-authenticate in order to retrieve necessary secrets for provisioning and running applications.
NOTE: This workflow differs for Admins who are granted root tokens, no permission restrictions here.
To provide these levels of access, two different Vault authentication strategies will be used specifically github authentication and app-id authentication.
The github authentication strategy was chosen here as we are already using it as a means of authenticating people for internal applications, and so some user grouping has already been done.
The app-id authentication strategy is used for roughly the same reasons as the generic secret backend. It is the simplest and most flexible to implement without relying on other systems.
Successful authentication via either of these methods results in a Vault token, which can be used to retrieve secrets.
Our github authentication includes simply allowing anyone in the SeatGeek Github organization on the team-developers team to be able to request and retrieve a Vault token. This is done by making a Vault login request with a Github personal access token. While this does not include everyone who writes code, it handles the majority of users for now.
Our app-id strategy reserved for machine authentication is highly dependent on AWS and our newer infrastructure strategies. When an AWS machine boots up, it can be configured to run with an IAM Role. This role is unique per application per environment, and also includes an id which can be retrieved from an instance’s metadata on the machine itself. Using this information, all SeatGeek IAM roles are whitelisted within Vault against their matching app and associated with a IP Range that corresponds environment’s VPC IP Range. This is our user-id in Vault terms. Machines can then make a Vault login request with the app they are responsible for running (applied during configuration management) and their IAM Role Instance Profile ID (attachment id). Assuming all pieces line up (IP address, app id, IAM Role Instance Profile ID), a Vault token is granted.
Additionally and only for machine authentication, there is a ENVIRONMENT-base-ami role that all machines can authenticate as. This allows for all machines on boot to be able to retrieve environment secrets via Vault’s app-id strategy without knowing which app is to be deployed. This is/would primarily be used to be able to test the Base AMI in isolation in our environments.
In both of these app-id authentication scenarios, the user-id is the machine IAM Role Id. However, when applications authenticate, the user-id is app-IAM_ROLE_ID. user-id’s must be unique, and this allows for us to have two user-id’s for a give IAM Role along with the appropriate configuration.
In the latest release of Vault, the app-id strategy has been deprecated in favor a new app-role strategy. Ultimately we will migrate from app-id to app-role with roughly the same implementation but are currently held back by the version of Vault (0.6.0) and the vault-ruby (0.6.0) gem we are using.
Authorization
Vault implements authorization via its own ACL’s or policies. These provide a set of permissions which can be scoped to various operations within Vault, typically indicated by namespaces. In the case of obtaining secrets, that namespace is secret. Additionally, these ACL’s can be associated with the various authentication strategies. A more generic way to think of it is a client authenticates and is granted a token. That token, among other things, is associated with a role and corresponding set of policies (same as other authentication/authorization strategies).
The current policies are used to control access to Vault secrets:
As far as developer authorization, all Github users are granted staging-read-only and testing-read-write, which if not obvious, means that any secret under the staging namespace can be read, and free reign with the testing namspace. production read-only access will be granted on a per application bases to service owners, and be implemented via Github teams.
As far as machine authorization, machines are granted the ENVIRONMENT-APP-read-only and ENVIRONMENT-common-read-only. As such, machines can access the common bucket and their app bucket within their ENVIRONMENT, nothing else. Cross ENVIRONMENT and cross app secret access is currently disabled and discouraged, although this might be revisited in the future.
Important to note here is the inability for non-Admins to write or update anything in Vault. These permissions are currently restricted to members of the Operations team, but this will surely be revisited in the future.
Token Managment
As of now, Vault tokens last forever once granted. This is a temporary measure that allows for simplicity of use, but additionally tooling will allow for this be changed.
Causes for Concern
Admins are granted root tokens
Developer authentication and authorization is reliant on Github
Machine credentials can be used on other machines within an IP Range
Assumptions are made around machines running a single application
Tokens last forever and be reused if retrieved
Vault is not using TLS
Metrics are not currently sent anywhere
No ui solution for managing secrets
Not possible to easily assume an application’s environment
Strategic Improvements
Admin Tokens
Currently, Admins are granted root tokens without permission restricitons. The latest version of Vault (0.6.2) has changed the ways in which root tokens are created/used, and as such, these could be substitued for Admin tokens or tokens with equivalent or slightly less permissions granted.
Developer Authentication/Authorization
With a centralized login system, developers would be able to authenticate with means other than Github potentially being more flexible and less dependent on a 3rd party. Permission granularity could also be provided on a per user basis allowing for trusted production access (ex: service owner access).
Machine Authentication
While we are already leveraging AWS for machine authentication, there are improvements in Vault to make this simpler and more secure. This integration would tie us tighter to AWS infrastructure, but it is doubtful we would run servers elsewhere, and if so we have an existing strategy.
These improvements involve allowing machines to one time authenticate with AWS dynamic metadata, addressing the issue of credential (re)use on different machines. Machines can be currently whitelisted by IAM Role or AMI.
App Authentication
We currently have a decent strategy for machine authentication, but our application authentication lacks flexibility. Specifically we assume that a single machine is running a single application and as such has a single IAM Role with the appropriate permissions for that application. This does not work if multiple applications coexist on a single machine, or if an application is broken up into tiers.
A way to combat this is to have application authentication use a different mechanism than machine authentication. This will require a revisit but will most likely leverage Vault’s Cubbyhole to multi-application scoped tokens via one time tokens.
Token Management
Tokens last forever currently, and should have leases and TTL’s. This would involve additional work to renew token leases as necessary.
TLS
TLS is disabled on our Vault cluster as it is addressed only within our internal network. With the requirement of TLS for all HTTP 2.0 connections, this will be revisited in the future and most likely with Vault serving as an internal CA.
Metrics and Monitoring
We are still in the early stages of adoption and use, but Vault has support for shipping application stats via a few means including StatsD.
Web UI
Either writing or adopting an existing open source solution would be extremely beneficial, as it would remove the burden of managing secrets from the Operations team while also allowing developers more control over how their applications are configured.
Locally Assuming App Roles
There is currently no way to run a command locally using the credentials in staging/production for a given application. Something like a .env file writer or a foreman-style command runner for our application manifests could go a long way in allowing developers to run services locally while simulating an environment.
Vault differentiates itself from other secret management services with its high availabilty option, and we leverage the Consul backend to deliver that. The Consul client is already configured to run on all of our machines (with default port mappings), with our Vault servers being no different. This also means that all data is stored encrypted in Consul, and so the Consul install should also be highly available.
As Vault is run within our internal network (and for other reasons), TLS is disabled. While this is desireable, we need to do additional work to make internal TLS usage a reality. Vault is also running on the standard default port of 8200 and listening on all network interfaces.
At SeatGeek, our mission is to help you see more live events. While we are very proud of how easy it is to find and buy tickets for events you already have in mind, we believe there is quite a bit we can improve when it comes to discovering new events. This blog post discusses what we’ve tried in the past, a couple features we’ve recently launched, and our larger vision for improving event discovery moving forward.
The Past
Our first major attempt at improving event discovery goes back to 2011 when we launched a calendar-based “Pandora for Live Events” called Columbus. This feature recommended events based on your favorite teams and performers. Despite our best efforts, Columbus wasn’t the big hit we expected. It had low usage numbers and didn’t translate well into a mobile-first world, so we decided to sunset1 this feature several years ago.
The Present Recent Past
Since then, our event discovery experience has consisted of primarily:
Search
Location based recommendations
The ability to keep track of your favorite teams and performers
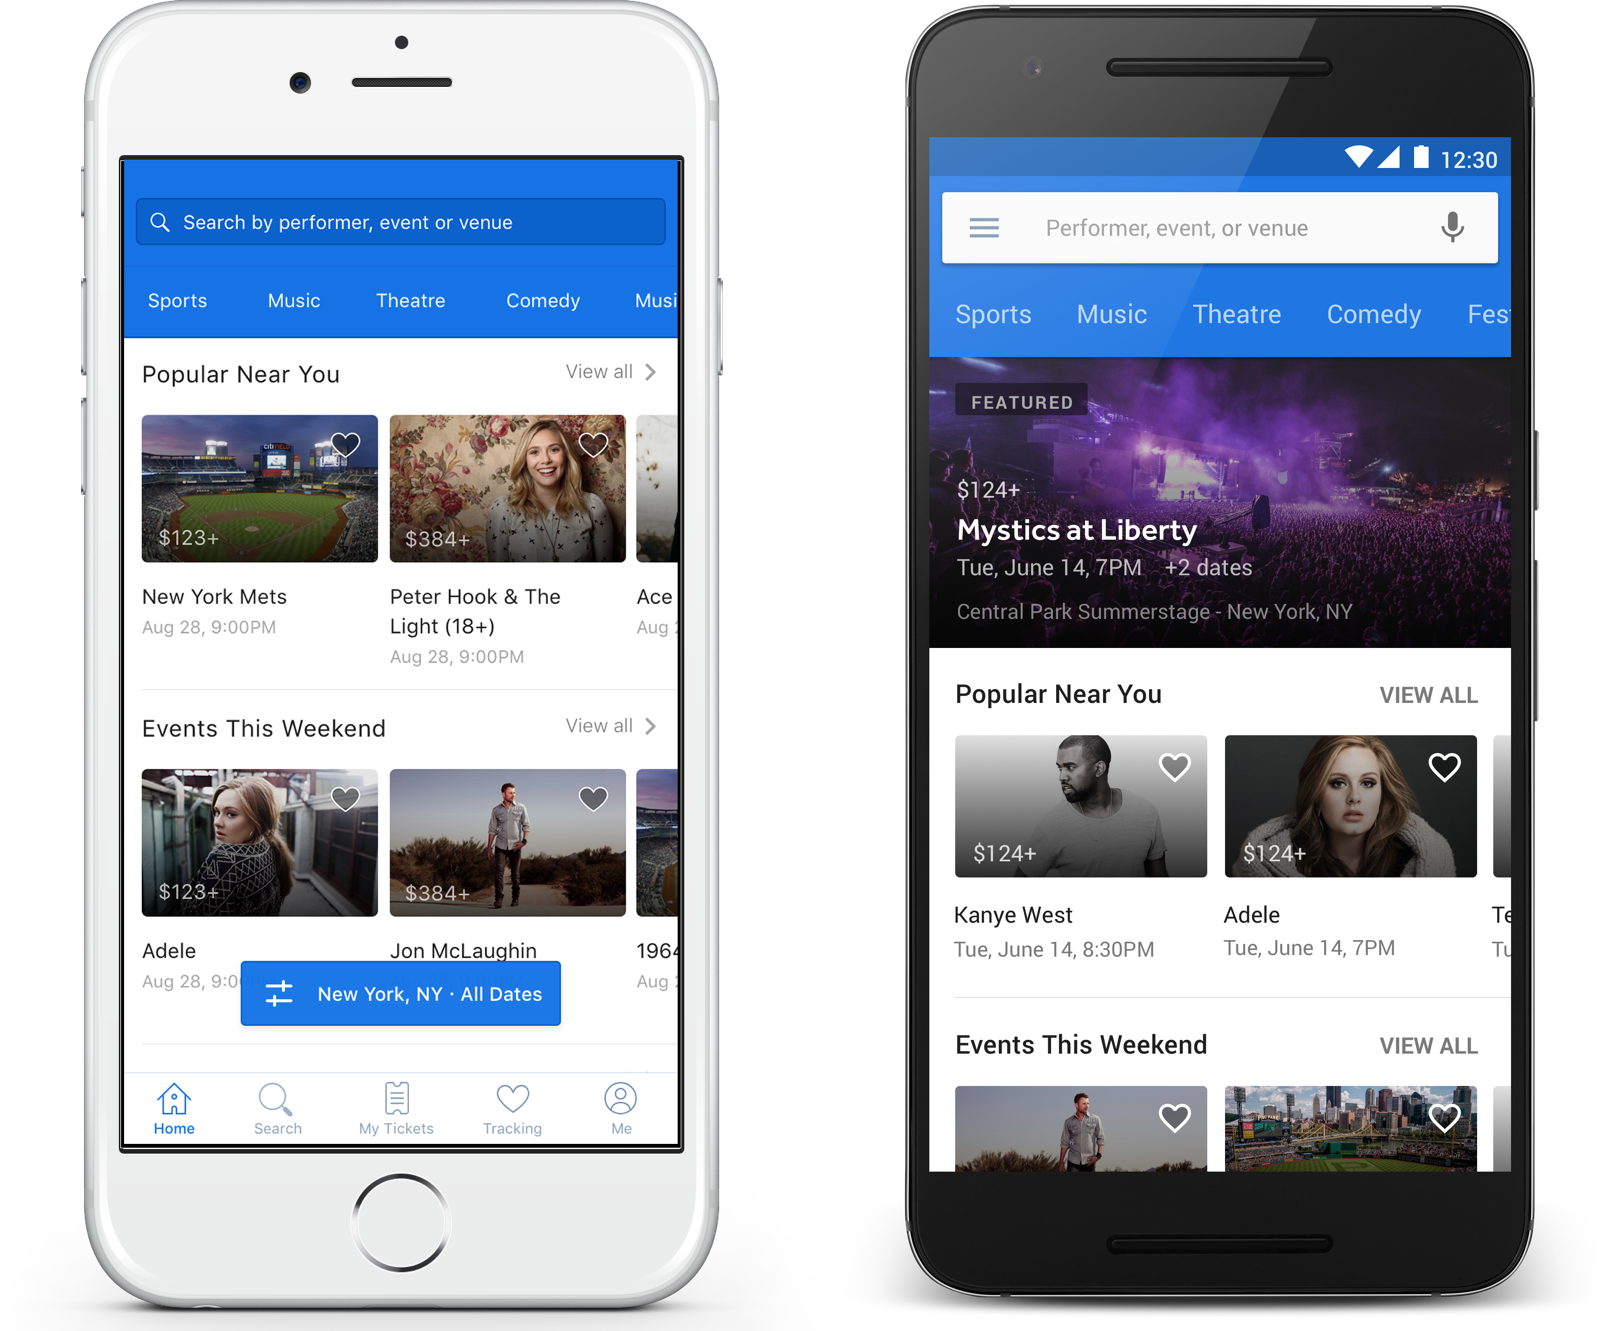
Here is how we surfaced these features in our mobile apps not too long ago:
This version was useful when you had a specific event in mind or if you were a power user with dozens of tracked performers, but left a majority of people yearning for more. It wasn’t useful for answering more general types of questions such as:
Are there any good comedy shows in New York tonight?
What are the most popular shows in San Francisco?
What are some affordable Broadway shows when I visit New York in 3 weeks?
What rock concerts are playing in Los Angeles this weekend?
Said differently, this version was good at search, but had room for improvement for browsing and general discovery:
Where to Start?
Once we decided to focus on improving event discovery, we next needed to figure out where to start. The ideas were endless: social integrations, date filters, price filters, genre filters, semantic search, ability to sample songs, ability to upvote and downvote recommendations, a notifications tab, revamped onboarding, and countless others. In addition to all these ideas, there was an equally large number of ways to implement each idea. Do we want to have one feed similar to Facebook? Multiple lists on the screen like Netflix? A card approach that focuses on gathering preferences for every event? We knew we wanted to take an iterative approach where each feature stands on its own but also builds towards an ambitious long term goal2, but it wasn’t immediately clear where we should begin, how these items would fit together, and what exactly the long term goal would be.
Larger Vision
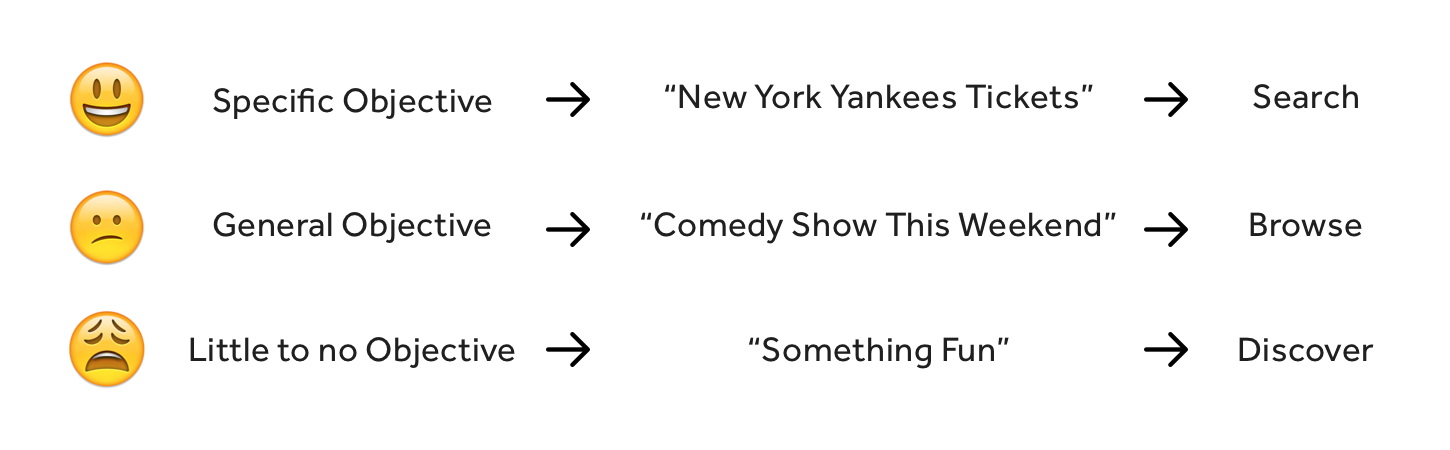
After carefully reviewing our options, we decided to guide our approach by looking at the relationship between types of user input (specific objective v general objective v little to no objective at all) with the different levels of personalization complexity required to return relevant results for a given feature.3
Search
For example, the bottom left of this chart describes search functionality, where there is a specific input (“Yankees tickets,” “Along Came Polly,” “Sweetgreen”) and a small amount of personalization needed to return a relevant result:
Browse
Moving up and to the right leads you to browsing features, where inputs are more general in nature compared to searching for a specific team or event. The more general nature of these inputs (“Comedy shows this weekend,” “Coffee in Nolita,” “A romantic comedy”) requires a bit more work to return relevant results.
List Based Discovery
Moving up and to the right again puts us in the discovery realm (“Find me something fun to do,” “Find me a good movie to watch right now,” “Find me a good place to eat”). For discovery based features, like Netflix’s homepage, there is no explicit input initially, which makes it a bit harder to return relevant results (in the case of Netflix both relevant lists and relevant shows or movies within each list). List based discovery offers many different types of recommendations, making it a bit easier to provide at least one relevant result.
Feed Based Discovery
While it’s no easy task to return relevant list based recommendations, there’s another level of personalization complexity required to surface 1-2 highly relevant pieces of content just by opening the app, as is exemplified by Facebook’s News Feed and Spotify’s Discover Weekly. This requires a sophisticated personalization strategy to do well.
Looking at the relationship between user input and personalization complexity helped us answer the questions mentioned above related to where we should begin, how these items would fit together, and what exactly the long term goal would be. We’d start by focusing on the browse experience because it would require minimal personalization complexity. We’d then move towards a list based discovery experience, and ultimately aim for the ambitious goal of having a feed based discovery experience that would show people extremely relevant content simply by opening the app:
The Present
Based on this high level plan, we recently launched several new features that improve the search and browsing experience. These include
The ability to find events for a specific date or date range
The ability to browse and search by specific categories and genres (Music, Sports, Comedy, Theater, etc.)
The Future
Over the next several months we are going to continue to improve the browse and discovery experience. While we have a general idea about what we think will work best, we plan to run experiments at every step along the way to understand what users actually find most useful. There are plenty of apps that provide great discovery experiences (Netflix, Facebook, Spotify), but that doesn’t necessarily mean their approach will translate well for the types of items people are searching for on SeatGeek. Here’s a preview of a couple future experiments:
We hope these new features help you find more events to attend with your friends! As always, we’d love to hear any feedback or suggestions you have to improve the app!


