Code, Design, and Growth at SeatGeek

Jobs at SeatGeek

We are growing fast, and have lots of open positions!

Explore Career Opportunities at SeatGeek

Refactoring Python with LibCST

Much of SeatGeek’s core is powered by Python. We rely on several Python services — built on top of the Tornado async web server framework — to deliver tickets to fans, manage our inventory, process payments and payouts, and more.

A few months ago, engineers at Instagram published Static Analysis at Scale — a detailed explanation of how Instagram automates large-scale refactors of their Python codebase using their newly open-sourced tool, LibCST. We were immediately excited to see how we could use LibCST to automate improvement of our Python codebase and eliminate hours of tedious dev work needed to perform large-scale refactors by hand.

This article details our experience building our first major LibCST codemod and using it to automate thousands of lines of code refactors on a large internal commerce service. If you’re interested in the codemod itself, you can explore the source code at https://github.com/seatgeek/tornado-async-transformer.

Choosing a Refactor

As we explored potential refactor targets for a LibCST codemod, we looked specifically for a refactor that:

  1. Delivers clear value to our services.
  2. Is currently performed manually by our developers.
  3. Involves a level of complexity that requires use of LibCST (i.e. not something that can be done with a simple find & replace.)

We landed on upgrading our coroutines from Tornado’s legacy decorated coroutines (an ugly but essential hack created to provide async coroutines to a pre-async Python) to native async/await coroutines (introduced to the language Python 3.5). The Tornado documentation recommends using native async/await coroutines but continues to support the decorator syntax, which much of our legacy code uses. Here are two blocks of code that do the same thing; the first is written as a decorated coroutine and the second is written as a native coroutine.

1
2
3
4
5
6
7
8
# legacy decorated coroutine
from tornado import gen
import async_http_client

@gen.coroutine
def fetch_example():
    response = yield async_http_client.fetch("http://example.com")
    raise gen.Return(response.text)
1
2
3
4
5
6
# native async/await coroutine
import async_http_client

async def fetch_example():
    response = await async_http_client.fetch("http://example.com")
    return response.text

The decorated coroutine:

  1. requires importing the tornado library to run asynchronous code
  2. repurposes the yield keyword to mean “await a coroutine”
  3. requires values to be returned using raise gen.Return

Benefits of Using Native async/await Coroutines

Migrating from decorated to native coroutines provides several benefits, both to the operation of our services and to dev experience.

  • Code readability
    • Context-switching between meanings of the yield and raise keywords confuses developers and creates awkward code.
    • Native coroutines look like those of other languages used at SeatGeek, like C# and Javascript, creating a more open internal codebase.
    • No onboarding engineer likes to hear that they have to learn a new syntax for returning a value from a function.
  • Debugging/Monitoring
    • In pdb, stepping into a decorated coroutine lands you deep in the weeds of the Tornado event loop rather than in the body of your coroutine.
    • Exceptions raised from decorated coroutines produce bloated stack traces that clutter logs and exception monitoring services.
    • Some monitoring services, like New Relic, only provide event loop aware diagnostics when using native coroutines.
  • Performance

Using TDD to Build the Codemod

Using test driven development seemed the obvious choice for building the codemod for the following reasons:

  1. Codemods are inherently testable. All you need to write a test is the original code, the expected refactored code, and a few lines of helper logic to run the test.
  2. We had already done this upgrade by hand on a smaller Python service and had collected a set of refactors from that PR which we wanted our codemod to support. Each of these refactors could be made into a test case.
  3. Syntax trees require a lot of mental overhead; incremental test validation allows for quick tinkering-until-its-right development while protecting from breaks of existing functionality.

We built a simple helper function that visits a test_cases/ directory and iterates over its subdirectories. Each subdirectory represents a supported refactor of the codemod and contains a before.py and after.py file of the intended pre and post refactor code. We feed these test cases into a parameterized pytest function that runs our codemod on before.py and compares the output to after.py. Voila, we have a test suite! Adding a new test case is as easy as writing a Python file, manually refactoring it, and dropping the pair in test_cases/.

Unsupported Refactors

We realized early on that there are some features supported by decorated coroutines that aren’t available with native coroutines, like yielding a dictionary of coroutines. Upon encountering one of these cases we cancel the refactor, display an error message to the developer, and only allow the codemod to run after the developer has manually refactored that piece of code.

To test these exception cases, we created a second collector that visits an exception_cases/ directory and iterates over its Python files. Each file represents a known unsupported refactor and contains a module-level docstring with the exact exception message we expect the developer to see when this code is encountered. These examples are fed into another parameterized pytest function which asserts that the codemod raises the expected exception message when run on the provided code.

Here is an an example exception case test file: yield_dict_literal.py:

1
2
3
4
5
6
7
8
9
10
11
12
13
"""
Yielding a dict of futures
(https://www.tornadoweb.org/en/branch3.2/releases/v3.2.0.html#tornado-gen)
added in tornado 3.2 is unsupported by the codemod. This file has not been
modified. Manually update to supported syntax before running again.
"""
from tornado import gen


@gen.coroutine
def get_two_users_by_id(user_id_1, user_id_2):
    users = yield {user_id_1: fetch(user_id_1), user_id_2: fetch(user_id_2)}
    raise gen.Return(users)

Demo Site

Inspired by https://black.now.sh/ — a website where developers can try out the Python Black formatter — we wanted to have a simple website where developers could use our codemod without installing anything to their local environment. With a few lines of HTML, JS, and a POST endpoint, we built a demo website (linked in our repo) where developers can try out the tool and run one-off refactors with easy diff visualization.

Rolling Out to Production

One paradox of codemods is that in their early phases, especially when applied to critical codebases, one ends up spending nearly as much time verifying that the automated refactors are correct as one would doing the refactor by hand. To mitigate this, we started by automating a few smaller (~20-200 line) refactors, which we closely reviewed before shipping. Once we felt confident that these changes didn’t introduce any regressions, we rolled out the codemod to our entire service, refactoring over 2,000 lines of code in an excitingly seamless deployment.

Conclusion

We had a ton of fun building our first LibCST codemod and are already looking for new applications of the library. Running a codemod you’ve built on a large codebase is pretty exciting, especially as you look through a multi-thousand-line diff that could have been hours of tedious, error-prone dev work. Becoming comfortable writing codemods expands your imagination of the level of refactors that are possible, and potentially quite easy to do, within your organization, no matter their scale.

We’d like to thank the team behind LibCST for being friendly, welcoming people and for frequently pushing out new, awesome features to the library.

If you’re interested in helping us build codemods for our codebase at scale, check out our Jobs page at https://seatgeek.com/jobs. We’re hiring!

Celebrating Waterloo Interns at SeatGeek

This week at SeatGeek, we are saying a fond farewell to four fantastic co-op students from the University of Waterloo. This was our first time participating in Waterloo’s work partnership program, and we are thrilled with how it has gone.

There’s always more to be done at SeatGeek, growing as fast as we are, and working with the co-op students from Waterloo let us conquer new projects while connecting with the academic world and exposing our company to a talented group of students.

In this post, we want to highlight the contributions of our co-ops and let them describe what they did for SeatGeek.

Erin Yang - Data Team

I worked on the Data Science team. At SeatGeek, the data scientists also perform the data engineering tasks. We collect data and maintain our production services in addition to harnessing the data for the company. I was able to blend well into the team, contributing to both responsibilities. I took on initiatives to reduce tech debt, learned Apache Spark and wrote production EMR jobs.

I also worked on two larger research projects using the data already in our warehouses. Both gave me the chance to flex my analytical skills, proposing performance metrics and predicting business outcomes. In this post, I will only discuss my work on stadium-level pricing recommendations.

For individuals looking to sell tickets on our SeatGeek, we recommend listing prices based on historical data and other listings for the event in question. I investigated what we could learn by trying to recommend listing prices to a venue or promoter organizing a new event. This would mean recommending prices for all the seats in the venue at once and using only historical data as there would be no existing listings to compare against.

I have built a system that will give price recommendations for each seat based on historical secondary market prices for similar events at the same venue. I trained a statistical model using secondary transactions records, considering the variation in all-in price (prices with fees), 2D and 3D seat locations, event types, and more event-level features. As long as we have sufficient transactions for a section in the venue’s map, then we are able to generate price distribution of all seats in this section.

The predictions offer us some insight into how an optimally priced event might look. Here we see the ideal prices (normalized by event) for 3 large American venues (the darker seats are cheaper):

Suggested Seat Prices

One thing worth noticing is that the recommended prices within a section decrease as the seat gets further from the field. Although this seems intuitive, it goes against common practice. Often venues or promoters will price all the seats in a given section (and adjacent sections) uniformly. In this example map, we give all the tickets in sections 101 and 102 the price of $65. We can see that the deal quality drops off as we move back in the section.

Deal Quality For Section 101

It is not easy to contribute to a company as a data scientist in only four months. Nevertheless, I had an incredible time working here. I received a significant amount of guidance and support from my team members, and was able to test ideas and improve our production services.

Hobin Kang - Data Team

During my time at SeatGeek I worked with the data science team focusing on projects related to Search Engine Marketing (SEM). Working on SEM required me to work on a variety of levels in the Data Science stack, ranging from tasks such as optimizing SQL queries for daily revenue per ad click predictions to analyzing onsale data. Working at SeatGeek gave me a better perspective on what the data science process is and how crucial data engineering groundwork is for a successful data science project. All successful data science products start with a strong data pipeline and infrastructure.

Working in SEM means interacting with complicated domain-specific problems and data sources. Our team is working on optimizing SEM ad spend by predicting the value of clicks on our SEM ads, but that work relies on a complicated network of ETL tasks (Extract, Transform, Load). I mainly worked on ETL for SEM tables, adding new data sources and centralizing query logic. One of the tools I was able to learn when performing ETL work was Luigi. Luigi is a python module that helps engineers build complex pipelines while handling dependency resolution and workflow management. Some SEM jobs have strict upstream dependencies, making this a perfect use case for Luigi. Working first hand with ETL jobs in the data warehouse, I was able to familiarize myself with the Luigi framework.

After writing a complex query that follows many upstream dependencies from AdWords, inventory and sales tables in our data warehouse, I understood how complex a productionized Data Science project can get. This internship helped me understand the importance of data engineering. I also realized that modeling is useless without having the right data in the right places first. Working from the ground up gave me a new perspective on how every part of the stack falls together to create a cohesive and concise project.

Sam Lee - Product Team

At SeatGeek, I was a member of the Discovery team. The focus of this group is to help users find the perfect tickets to the perfect event. We focus on building user-facing features, but shipping these features almost always requires significant backend development.

I worked primarily on two projects: improving discoverability of parking passes and adding song previews to the iOS browse screen. Both projects were in line with the Discovery team’s mission, but in slightly different ways. The improvement to parking pass search results helps users find tickets they are already looking for, while the song previews help users discover artists they might not be familiar with.

When we list parking passes, we make separate parking-specific event pages so that our users can see maps of the lots just as they would see seating charts. These events can be tricky to find though, so we worked to pair parking events with their parent events, surfacing both in relevant searches. This increased visibility further advertises our in-app parking events to our users and, like the track previews, keeps the experience within the SeatGeek app.

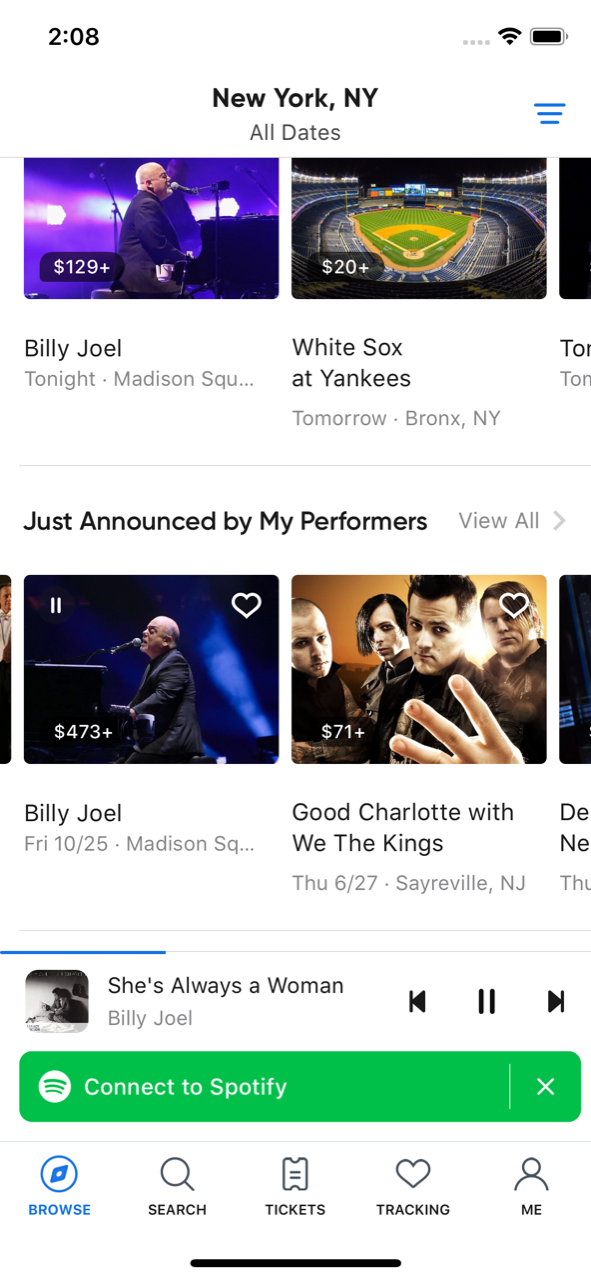
Our song previews project helps introduce users to new performers. In the past, if a user encountered a new artist while browsing events on SeatGeek, they would have to go elsewhere to learn about the performer, maybe listen to their music, and then return back to our app again to look at tickets. Now, with a single tap, users can play top tracks from featured artists while continuing to browse upcoming events. My contribution involved integrating data and functionality from Spotify in to our internal API payloads which enables our frontend to play tracks.

Song Preview Example - Billy Joel

Both of these projects spanned multiple weeks, represented real gains for the business, and improved our users’ experience. They were both complicated and difficult, spanning five different microservice repositories each with an entirely unique and intricate tech stack. I learned how to update ElasticSearch clusters, coordinate microservices using Google Protocol Buffers, and leverage Redis caches all while writing my first Python and Golang code, each with their respective frameworks, ORM’s, and paradigms.

At SeatGeek, I was privileged with an internship with unorthodox qualities: accountability, responsibility, and ownership. The projects I worked on made a direct difference to our users. I was not an intern during my time at SeatGeek; I was a Software Engineer for four months.

Tyler Lam - Product Team

I worked on SeatGeek’s Growth team, a cross-functional group of marketers and engineers focused on helping our product reach more users. My team’s work ranges from page speed improvements and paid search algorithms to design changes and promotions.

For my main project, I worked on enriching our theater pages. We had two motivating factors that made this improvement a priority.

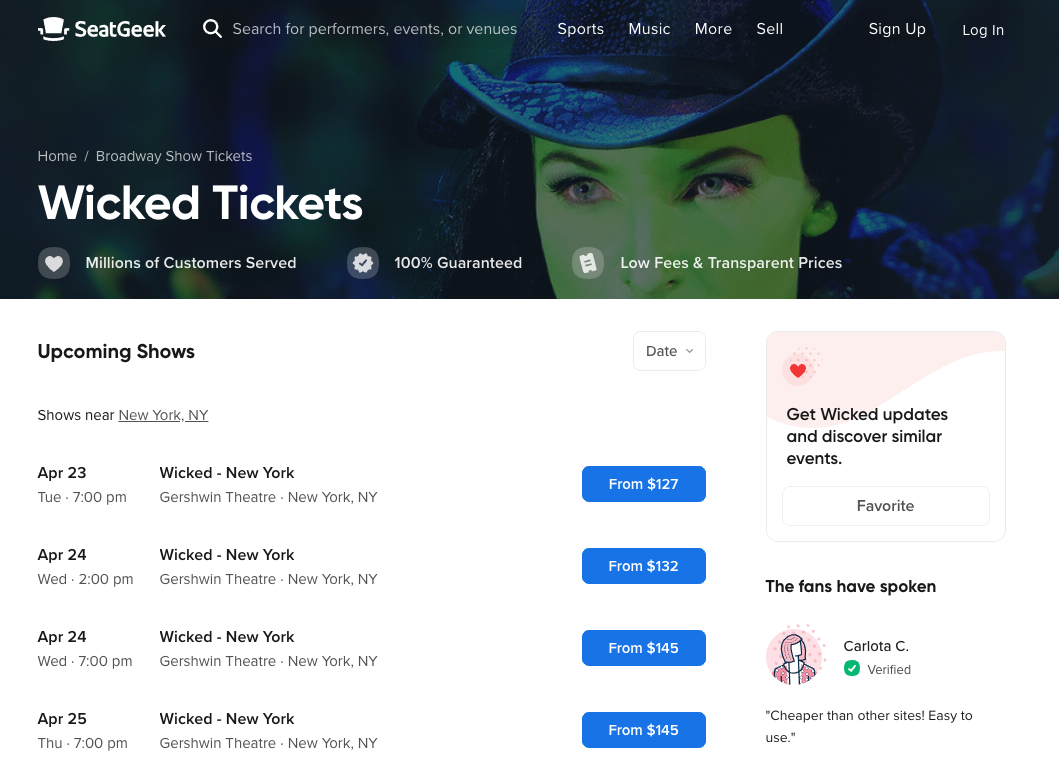
The first, as is often the case, was a desire to improve the user experience. Historically, our pages simply listed the upcoming events, as we do for sports teams or touring artists. For users trying to decide what shows to see, this wasn’t the most helpful view. These users would have to navigate away from our site to get information that would help them to choose a show.

Wicked Performer Page Before

The new, enhanced page includes a brief introduction to the production, logistical information about the performance (run-time, location, age restrictions) and a selection of critic reviews. We even show award wins and nominations for the shows that earn them! If these specs aren’t enough, the user can get a preview of the show by browsing through a photo gallery or watching the video trailer.

Wicked Performer Page After

The second motivation for these improvements centers on search engine rankings. A huge amount of our traffic comes from search results. For the Growth team, rising up a search page means the chance to introduce new users to SeatGeek. Enriching our theater pages with relevant content and links improves our search result scores and helps us show our improved pages to a larger audience. These new pages benefit SeatGeek from a business perspective and provide a better user experience.

Throughout my term with SeatGeek I sharpened my front end react skills and learned how to effectively collaborate with designers. It was rewarding to work on this project from start to finish and see it live in production, especially in the short time span of 4 months. The product team at SeatGeek provided many opportunities for their interns to make an impact.

Smart Order Tracking: On-Demand Delivery Time Predictions with Quantile Regression and TensorFlow Serving

All ticketing companies have to deal with the uncertainty that surrounds ticket delivery. Different teams, performers and ticket sellers follow different procedures, ship tickets in different ways, and operate at different cadences. This complicated ecosystem results in variable delivery times, making the ticket buying experience more stressful than it has to be.

At SeatGeek, we’ve worked to reduce this uncertainty by building a tool that lets our customers know exactly when to expect their tickets. “Where Are My Tickets?” is the question our users ask more than any other, and by answering it intelligently we make their live event experience as seamless as possible.

When our data science team set about trying to model the complicated and uncertain world of ticket fulfillment, we based our modeling decisions on the sort of answers we wanted to be able to provide. Expected fulfillment times would be nice, but it would be far nicer to know the likelihood of a ticket arriving before an arbitrary time. In other words, we wanted to fit full probability distributions of ticket arrival times, and we wanted these to be available whenever a user reached out.

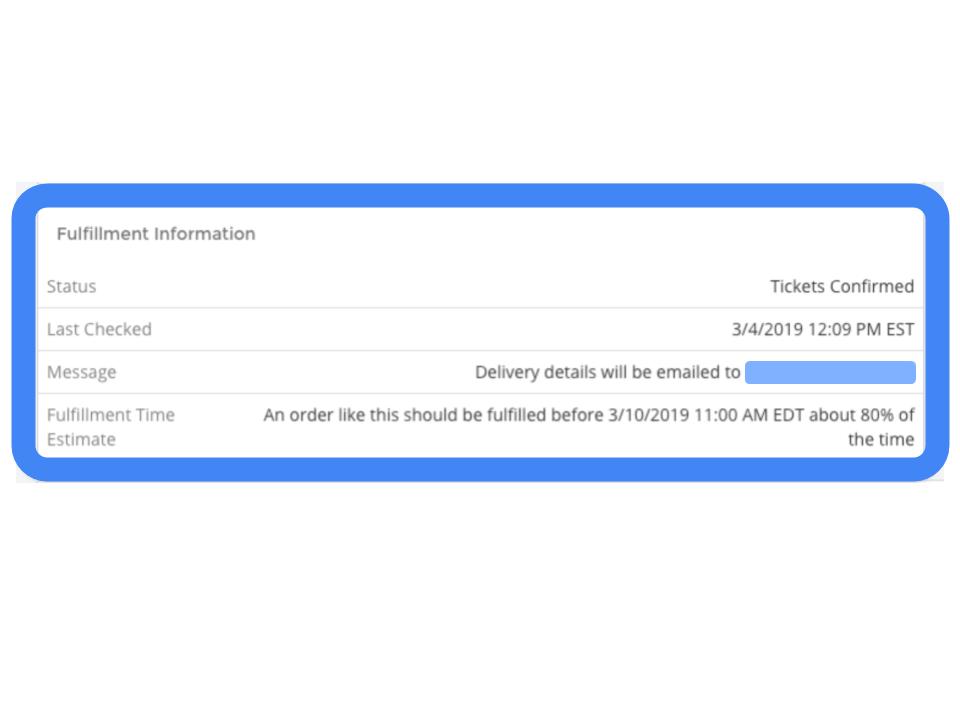
In the end, quantile regression and tensorflow-serving turned out to be the right tools for our problem, and our problem turned out to be an excellent use case for the tools. Today, our predictions are available at all times to our customer experience specialists. By default, we provide an upper-bound on the delivery time that should be correct 80% of the time.

cx_view_example

Quantile Regression

We needed to arrive at a conclusion of the form:

An order like this should be fulfilled before 3/10/2019 11:00 AM EDT about 80% of the time

This would require us to infer a nearly complete probability distribution for the ticket’s fulfillment time.

Quantile Regression lets us do just this. Quantile Regression is a method by which several quantiles of the probability distribution of the response variable are estimated simultaneously, approximating a full distribution. The quantile loss function can be used on linear or tree-based models, but in our case the features showed strong non-linearities and interactions, and a simple neural network outperformed other modeling options.

Using a series of intuitive listing-level features, we architected a network that outputs a set of values per observation, each corresponding to a manually selected quantile (here called target alphas) ranging from 0.005 to 0.995. Together, these quantiles estimate a full distribution.

To interpret our outputs, we need only insert the fitted value and associated target alpha into a sentence of the form shown above:

An order like this should be fulfilled before {datetime} about {target alpha} of the time.

Then if the fitted value for target alpha 0.95 is 3 days, we would say that the order should be fulfilled within 3 days about 95% of the time. We display the predictions associated with the 0.80 target alpha on our customer experience page, as shown above. These quantiles are all learned simultaneously by training the network with the quantile loss function.

Since our model approximates a full probability distribution, we can also fit conditional probability distributions. With these conditional distributions, we can use the fact that an order has not yet been fulfilled to update our estimate of how long fulfillment will take. As time passes, we regenerate upper bounds from the conditional distribution of fulfillment time given the observed period of non-fulfillment, making our outputs even more intuitive.

Sometimes customers contact us before we expect their tickets to be fulfilled. For these tickets, where the time that has elapsed since the order remains less than the expected fulfillment time, our predictions do not change much with time. However, as this time period approaches our expectations, our fulfillment time estimates incorporate this information, raising our upper bounds accordingly.

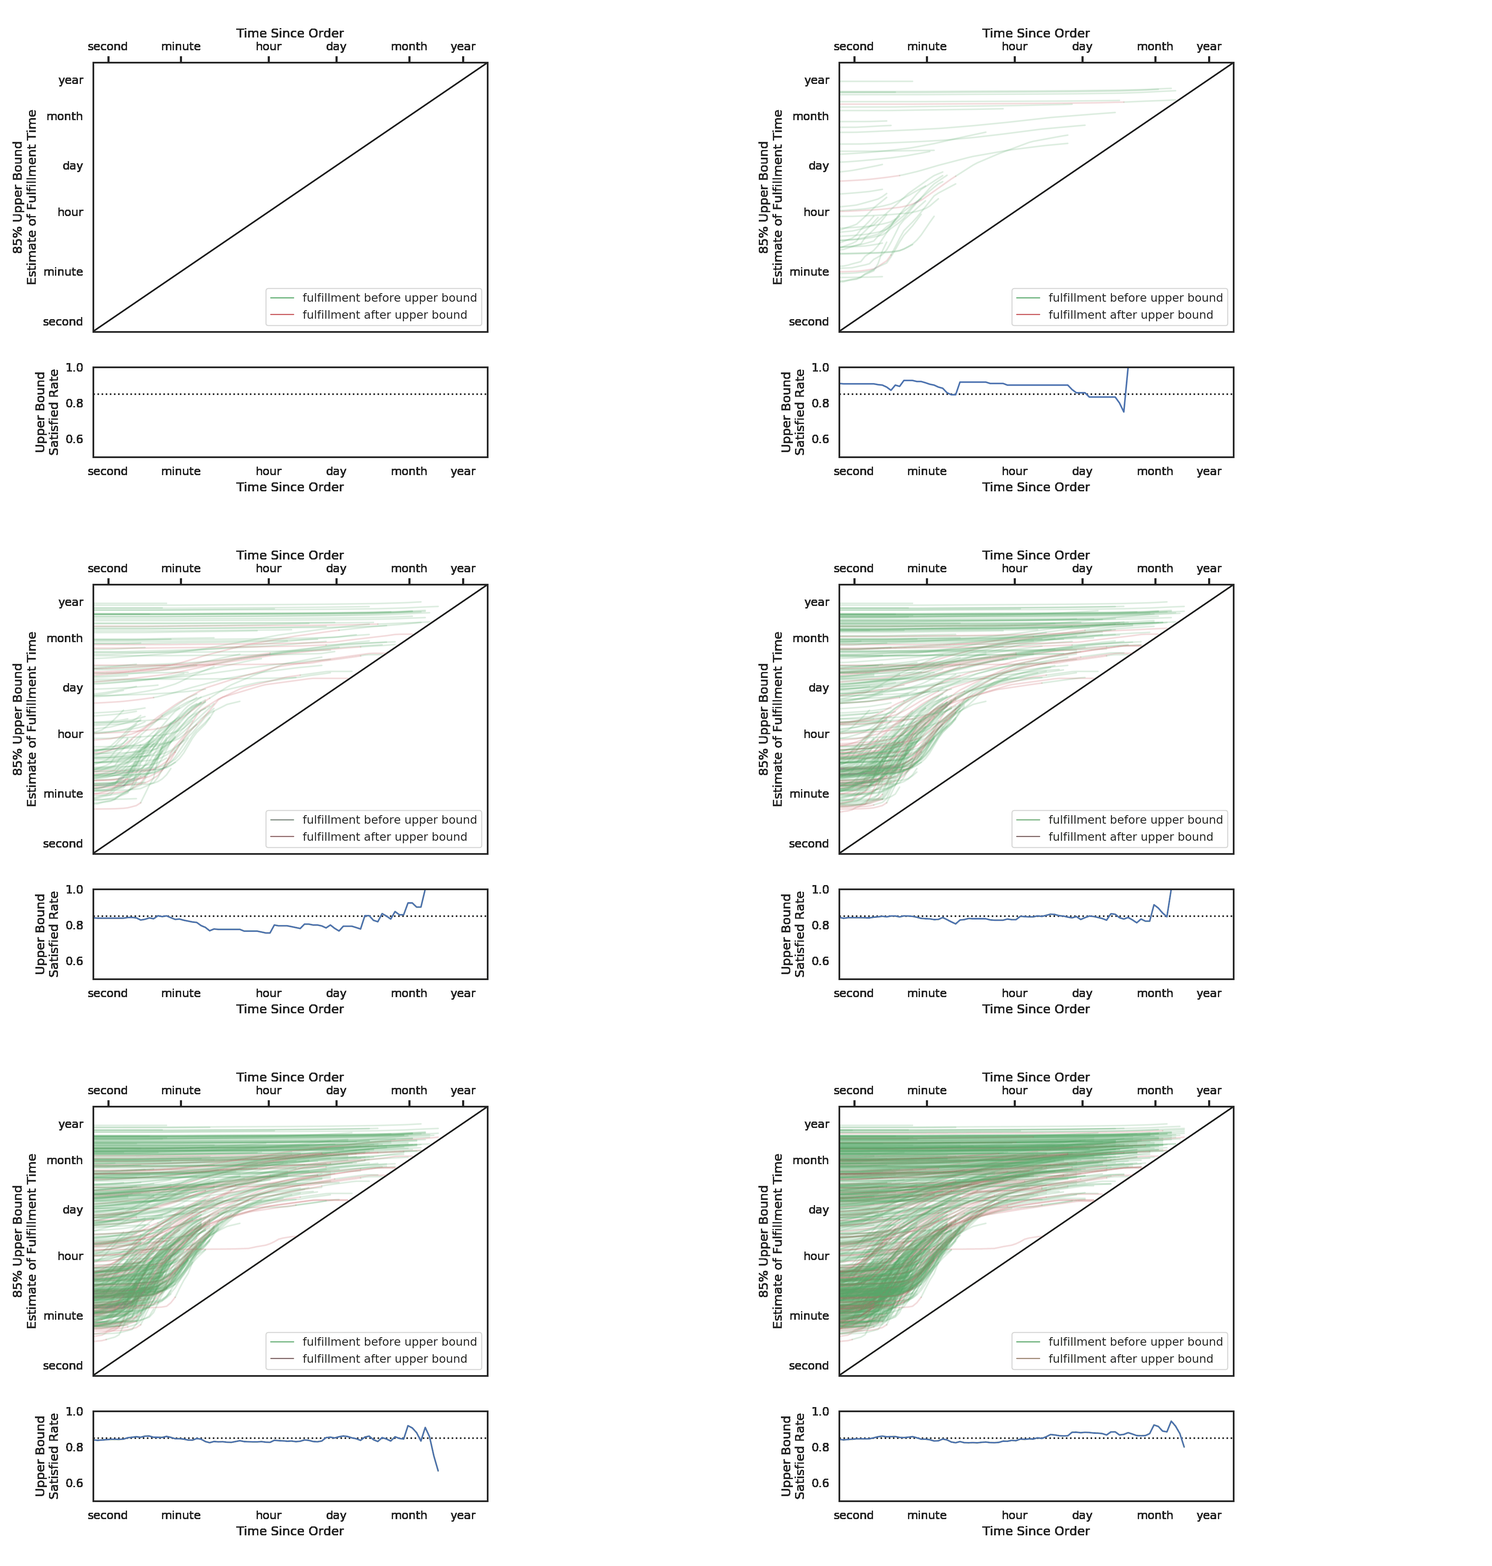
Here we visualize these updates. Each line is a ticket, and its place on the y-axis is determined by the initial median fulfillment time estimate. The x-axis represents time elapsed since the order was placed. From left to right, we can see the changes in our median estimates.

upper bound estimates for fulfillment times

You may notice that some lines start around the “hour” mark, and then increase after only a few minutes. These represent tickets to which our model fitted a bimodal distribution. While the median was on the order of hours, our model understood that the tickets would either be fulfilled in minutes or days. As soon as it’s clear that the tickets are not going to be delivered right off the bat, our model increases the predictions. There are many possible explanations of bimodality here. Perhaps these are tickets that should be delivered instantly, and any delays likely represent significant problems. No matter the explanation, this would be a difficult situation to capture with an ensemble of mixed models, but it is easily done with quantile regression.

Modeling the actions of hundreds of thousands of unique sellers might at first seem like a daunting task, but our strategy has yielded strong results. We measure success by pairing two metrics, R2 and Coverage Deviation. We use R2 to assess the precision of our median estimates, which can be thought of as point predictions, while Coverage Deviation looks at the fit of the larger distribution. To quantify this, we measure the discrepancies between our manually selected target alphas and the empirical alphas, which are calculated as the rates at which a ticket’s true fulfillment time is less than or equal to the expected alpha quantiles. For example, our second target alpha is 0.05. For each observation, then, the second output of the model is a time estimate that fits into the sentence:

An order like this should be fulfilled before {datetime} about 5% of the time.

We arrive at an out-of-sample empirical alpha by measuring the proportion of observations that had true fulfillment times less than their fitted 0.05 quantile. Our second empirical alpha is 0.0517, for a deviation of 0.0017. Coverage Deviation is the mean deviation across all of our alphas, and our model achieves a Coverage Deviation of 0.004. This confirms that our fitted quantiles mean what we expect them to mean. Pairing this score with an R2 of 0.7, we can be confident that our median estimates capture the likely fulfillment times and our sets of quantiles match the true distributions.

Tensorflow-Serving

Our goal was to provide our fulfillment time upper bound estimates instantaneously to users and customer experience representatives. Quantile regression gave us these estimates, and tensorflow-serving let us deliver them on-demand.

To maintain a web service that can be called by user requests, we need to ensure that requests can be returned within 50ms and that our service is available more than 99.9% of the time. These requirements can be burdensome when deploying predictive services.

The response-time requirement means that we need to carefully consider performance whenever we improve a model, and the uptime requirement can be a burden on our data scientists, who work on a very wide variety of problems and do not always have the bandwidth to monitor web services.

In collaboration with our engineering team, we researched off-the-shelf model servers, hoping to avoid building an entirely custom service. Model servers handle loading models, caching them in memory, and efficiently servicing requests. We gravitated toward tensorflow-serving because tensorflow is a powerful and flexible numerical computing framework, and because we have experience working with tensorflow on other features such as deal score.

We deployed tensorflow-serving in a docker container and pointed it at a neural network of comparable weight to our new model. We then used locust, a load testing tool, to evaluate the performance of this service and found that on our infrastructure it could handle about 400 requests per second, with the 99th percentile of response times at about 10 ms. Tensorflow-serving also scales horizontally, so we can always spin up more tensorflow-serving containers to handle a higher rate of requests.

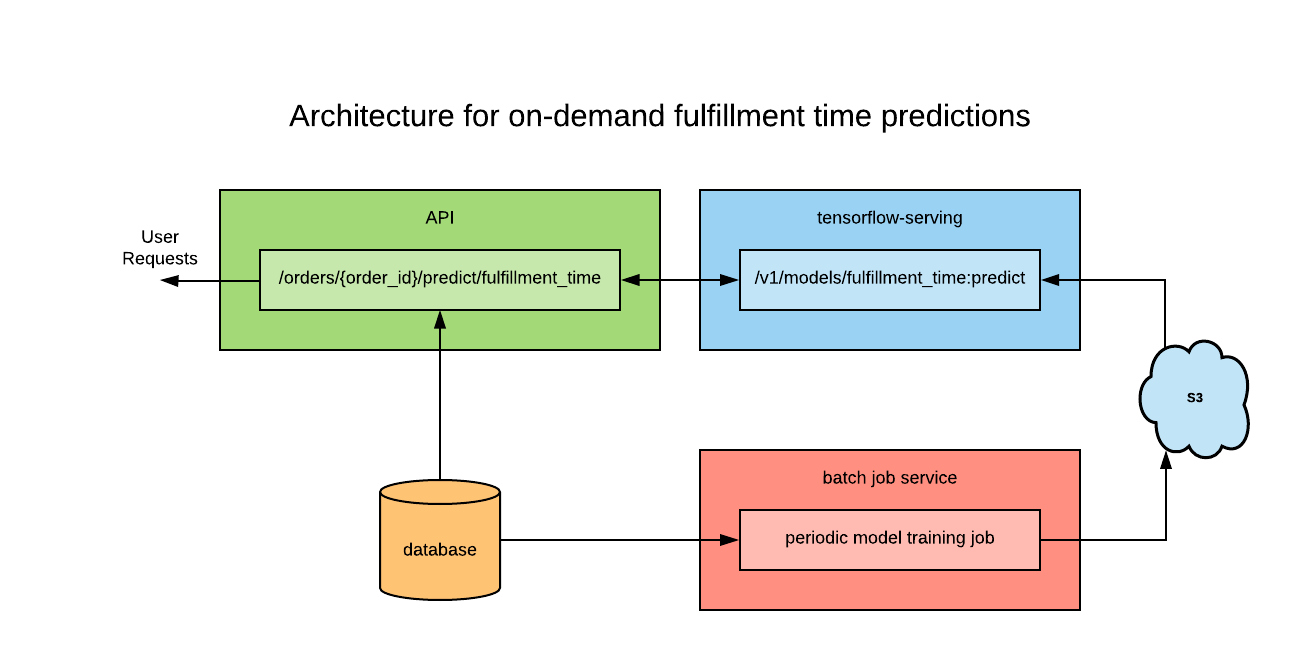
Our final ecosystem looks something like this:

architecture for on demand fulfillment time predictions

A batch-job periodically retrains our fulfillment time model and stores the resulting computation graph in S3. Tensorflow-serving watches for new model versions to appear in the bucket, and caches them as they arrive. An API endpoint was made to retrieve information associated with a given order and request fulfillment time distributions from tensorflow-serving. This architecture ensures that only the endpoint needs to access the features of a given order, making the whole process very convenient for anyone seeking to access predictions.

Customer Benefit

Currently, these predictions are available in real time to our customer experience specialists on their order information page (see screenshot above), and they us respond confidently to the “Where Are My Tickets?” queries that we receive. Our simple architecture also allows us to work toward exposing these predictions directly to our users, anticipating the questions before they even need to be asked.

Just by looking at the volume of inquiries we respond to, we know that uncertain fulfillment times add anxiety to the ticket buying and event attendance experience. In this instance, we found patterns in historical fulfillment times that could help alleviate that anxiety.

With quantile regression, we arrive at upper-bound delivery time estimates with granular levels of confidence, crafting exactly the sort of responses we find most comforting. With tensorflow-serving we make these predictions available to everyone seamlessly, reducing a major source of uncertainty in our users’ experience.

Why We Chose to Build SeatGeek Open on .NET Core

players huddle in front of beautiful Children's Mercy Park

In July of 2016, SeatGeek announced that we would be the primary ticketer of Sporting Kansas City in the following Major League Soccer season. This entrance into primary ticketing was a landmark moment in the company’s history. We would partner with an Israeli company called TopTix to ticket all events for SKC and their minor league team, the Swope Park Rangers, with the first game taking place only eight months later in March of 2017. TopTix provided a SaaS system called SRO4 built on the .NET Framework that enabled teams to manage their events, tickets, and customers.

In August, we founded the SeatGeek Open team to build the integration between our clients (e.g. Sporting Kansas City) and our customers. This new team had an ambitious schedule: we would integrate with SRO’s complex and expressive API on a short and inflexible timeline. Our new service had to be reliable and scalable enough to handle major ticket sales and live events. Most importantly, the credibility of the company and our future in primary ticketing depended on it.

SeatGeek mostly works with Python, although we’re comfortable using new languages and platforms when the use case makes sense. We started by trying out some Python SOAP libraries and working around the issues and inconsistencies that came up. The SRO API exposes hundreds of methods and thousands of classes, so development was slow and minor bugs were multiplied many times over. We also ran into performance issues when fetching the available listings in a stadium, which took up to two minutes to deserialize.

To meet our scalability and performance goals, we had to find a new approach. Because of its compatibility with SRO’s .NET Framework API, we began to consider .NET, but we had some misgivings. First, our team had limited experience with .NET. Second, even if we were willing to commit to C♯, it still wasn’t obvious whether we should use .NET Framework or .NET Core. If we used .NET Framework, we would have had to adopt not only a new language in C♯, but also a new operating system in Windows. On the other hand, .NET Core would run on Linux but was relatively unproven. These concerns would have required careful thought for any production service, but we were building the foundation of the company’s future and we needed to be sure it was solid.

We decided to build a proof of concept to evaluate the viability of this approach. We exported a WSDL of the SRO API and used that to generate a C♯ reference file. Using this, we began to build a .NET Core app that could communicate with SRO via SOAP in a strongly-typed manner. Having code completion made understanding and exploring the features of the API much easier. After we had successfully built out a few scenarios, .NET Core started to seem more realistic. When we looked at the community growing around .NET Core, we saw that the maintainers were actively responding to and fixing issues, which boosted our confidence in the viability of the platform.

eager fans being efficiently scanned in to the stadium

The next hurdle was integrating .NET Core into our existing infrastructure and deployment systems. Because it runs on Linux, we were able to write C♯ code but still deploy it using a Debian container stack, so we could continue to use the same deployment and monitoring tools SeatGeek uses for other services. We were also able to find an Entity Framework provider for PostgreSQL that worked with .NET Core, allowing us to leverage our existing investments in that database.

There were some challenges along the way. The first problem we had to face was our lack of C♯ experience. Our first commits after the switch were basically Python with more curly braces, but over time we began to learn and appreciate idiomatic C♯. The more impactful issue we faced was a lack of tooling support for .NET Core, especially on macOS. Because most .NET developers use Windows and the .NET Framework, we initially had trouble finding .NET Core versions of some popular libraries and tools.

In October, we committed to .NET Core. Over the next several months, we ramped up on improving our C♯ and building out API features. By January we had our first primary ticket purchase. In March, less than five months after we started development, we had our first home game. The system scaled flawlessly, and all 19,000 fans were scanned into the stadium without issue. Since then, we’ve signed several more clients with some of the largest venues in the world, including AT&T Stadium and the Mercedes-Benz Superdome. Handling events of that size might never be easy, but we are confident that .NET Core won’t be what holds us back.

In retrospect, .NET Core was the right choice for the SeatGeek Open platform. It was the best way to meet our goals of quick integration, high performance, and flexible deployment options. We’ve been thrilled to see the meteoric growth of the .NET Core platform over the past year and a half, and we’re fascinated to see what the future will bring.

How SeatGeek is Bringing Ticket Commerce to Snapchat

When we launched SeatGeek Enterprise in 2016, our stated mission was to use technology to reach and engage new patrons everywhere. We have taken that mission to heart, providing value for our clients by helping them reach new fans via integrated commerce partnerships. At the end of the day, our goal is to increase discovery of live events by using the power of the open web, putting tickets where fans are already spending time online. Our most recent endeavor toward this end is our partnership with Snapchat, the leading social platform for Generation Z.

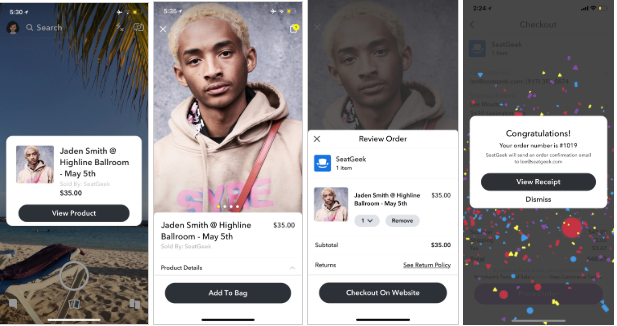
Through our partnership, SeatGeek was the first-ever company to enable live event ticket commerce on Snapchat, an ode to our commitment to innovation as we seek to expand both where and how fans can access tickets to the experiences they love.

Concerts: Jaden Smith

Jaden Smith

For our first pilot with Snapchat, we decided to focus on an event that would appeal to Snapchat’s demographic user base. 83.4% of youth between the ages of 12-17 are on Snapchat and 78.6% of people between the ages of 18 and 24. With this type of age group penetration, we settled on Jaden Smith, a popular young pop artist. After distributing the Snapcode for the concert on May 1st, we were able to completely sell out our full allotment of tickets in less than 24 hours. Initial feedback was that fans loved the experience of buying on Snapchat, noting that it was easy and fun. When asked if they’d buy on Snapchat again, the users resoundingly said yes. With a successful concert onsale complete, we then turned to sports ticketing.

Sports: LAFC

Snapchat logo next to LAFC

For our second pilot, we chose to use one of our SeatGeek Enterprise clients, MLS’ Los Angeles Football Club (LAFC) to test if we could sell sports tickets on Snapchat.

We chose the D.C. United vs. LAFC home game on May 26th and distributed the Snapcode for the match via LAFC.com, LAFC’s Snapchat page and Twitter. The results were better than expected and, similar to our Jaden Smith concert onsale, we were able to sell out our full ticket allotment within 24 hours. Even better, Snapchat was able to ship and handout special Snapchat soccer balls and other fun items to the fans who bought on the platform. In the end, we were able to deliver a new and innovative commerce experience to fans, surprise and delight them at the game, and bring a new commerce channel to our client LAFC.

SeatGeek Checkout

New Commerce Opportunities

Having successfully piloted onsales with Snapchat, we are full steam ahead at uncovering new opportunities for our clients to reach new fans in innovative ways.

As social media and other digital platforms continue to alter how audiences discover, discuss and experience live events, SeatGeek Enterprise will continue to be at the forefront of these trends, making sure our clients are optimized and ready to take full advantage of emerging paradigms.

Migrating to Python 3

A big number of the internal services we have at SeatGeek are running on Python 2, but with the end of life for this version being around the corner, and motivated by certain performance challenges we’ve had to face this year, we decided to spend some time investigating whether or not migrating to Python 3 was worth the effort. In particular, we use the Tornado framework and we noticed that the IOLoop was mysteriously getting stuck under high load scenarios. Would the story be any different with the new version of the language?

The process of migrating to Python 3

Migrating to python 3 was initially faster than expected, but turned out to be a tricky process in the end. With the help of libraries like six, future and 2to3 most of the changes to be done in the codebase can be mechanically done.

Originally we had selected the service responsible for normalizing ticket data from different markets to a single format as the target for the migration investigation, we ended up migrating the service responsible for fetching listings from all external markets instead. This was due to the fact that the service in question would exercise async IO operations more often than the more CPU bound service that normalizes the data. Based on many different individual reports on the Internet, this is one of the areas where performance should improve when combining tornado and python 3.

The process of migrating this service can be outlined as such:

  • Create a Dockerfile with python 3 support so that we can run the application in Nomad. We ended up using pyenv instead of virtualenv for installing python as we’ve been having a smootheresperience with it in general on our local dev environements as of late.

  • Migrate private dependencies to be compatible with pip 10. The new version of pip has a more strict build process, and installation failed with all of our private dependencies. We fixed this by adding a Manifest.in file to most repositories involved as transitive dependencies. The changes were mostly concerned with explicitly marking the files and folders that should be included in the package.

  • Migrate private dependencies to be compatible with both python 3 and python 2. This process was very straightforward to do, except for the cases where the transitive dependencies of our private repos were not compatible at all with python 3. A notable example is the MySQL-python library, which has no support for the newer python versions. A suitable replacement could be found in all instances, so this was not a show stopper.

  • Finally, apply the 2to3 script to the listings service and work through the failing test cases.

Things to look out for

In all of the migrated repositories, there were common broken things that required a common solution. This is a list of the things we can expect when migrating other services to python 3:

  • Importing modules with absolute or relative path resolution is error prone. The safest way of making a python module work correctly under both versions is to import all modules using the fully qualified name such as from mylib.my_module import foo instead of import foo from my_module

  • Exceptions need to be caught with the syntax except Exception as ex instead of except Exception, e. This can be fixed automatically by the 2to3 script.

  • The iteritems() method on dictionaries is gone, it can be safely replaced in all instances with the items() function. This can also be fixed automatically by 2to3

  • The print function needs parentheses. This is also fixed by the 2to3 script

  • Functions like filter and zip do not return a list anymore, but an iterator object. Better convert those to list comprehensions. The 2to3 script can help a great deal with this.

  • Modules such as urllib, and html, StringIO and a bunch of others were renamed. While the 2to3 script helps finding and fixing those, I found that it left too many loose ends. I found using the six library instead for manually replacing the imports a lot better and cleaner too.

  • The json.loads() function is more strict and throws different errors when failing to decode. Usages of this functions should be reviewed manually for places where we are expecting an exception, and the proper exception should be caught.

  • Unknown str vs bytes problems everywhere. This is the one issue that cannot be solved mechanically. Given how py2 treated strings as both bytes and plain text, there are any cases in the code base where using one or the other results in an error.

Fighting str vs bytes

As stated before, this will be the number one source of bugs once a project is running under python 3. After fixing a great deal one instances where the 2 types were used in an incompatible manner, We have a few suggestions for any future migration.

Most of the bugs can be traced back to getting data from external datasources and expect them to be strings instead of bytes. Since this is actually a reasonable assumption we can do the following:

  • Add a thing wrapper to the redis library to have a get_str() method. Replace all occurrences of redis.get() with redis.get_str() in the code.
  • Whenever using the requests library, use the .json() function in the response instead of manually getting the body and then decoding it as json().
  • Look out for any data received from s3 or similar amazon service, the return value of these libraries is always bytes. Manually review that we are not comparing the returned value with static strings.

Infra problems

The creation of a docker image for python 3 proved to be more difficult than expected, due to our pervasive assumption everywhere in our deployment pipeline and internal scripts that only python 2 with virtualenv is used. After fixing and sometimes working around these assumptions in the deployment code, a robust docker image could be produced. My suggestion for the near term future is to remove these assumptions from our scripts:

  • In our deployment tool, stop injecting the PYTHONPATH and PYTHONHOME environment variables. Let the dockerfiles do this instead.
  • Each Makefile should either drop the virtualenv assumption or add support for pyenv.
  • Consider using a Pipfile.lock file in all our repositories for more reproducible builds.
  • I could not make gunicorn work for the service, either we need to invest more time tracing the root of the problem or find a replacement for it.

A possible replacement for gunicorn could be implemented with either of the following strategies:

  • Install a signal handler in the python services to catch the SIGINT signal. Once the signal is caught, make the _status endpoint always return an error code. This will make consul unregister the allocation, which will cause no new traffic to be routed to it.

  • Install nginx on each allocation and make it the reverse proxy for the tornado server. Set up nginx to graceful shutdown on SIGINT or any other suitable signal.

Additional action points

During the process of migrating to python 3 we left a couple loose ends in order to save time. The first one is critical to the correct functioning of the logging system.

  • Currently logging json using the loggers provided by our base libraries is not reliable, for some unknown reason some of the loggers are setup to output plain text. More careful study of why using custom formatters is not automatically applied to all created loggers is required.

  • Migrate the applications to tornado 5, which was better integration with the py3 built-in event loop. Under no circumstance use tornado 4.5.3 as it has a serious bug under python 3.

  • Find a solution to deploying services which serialize data using pickle. The migrated service, for example, stores pickled binary strings in redis. We need to make sure both versions use different key paths, for the time both version are running concurrently.

Performance

In order to analyse the performance characteristics of python 2 vs python 3, we created a test where a single event’s listings are fetched through an aggregator service. The caching proxy was taken out of the mix so that I could see the service behaviour under heavy stress.

Using 40 service allocations (each one maps to roughly a single machine CPU), this is the result of using py2 vs py3:

There seems to be an interesting performance difference at the beginning of the chart. It was also interesting that repeating the experiment yielded a similar graph:

There is a chance that the difference between both lines is not actually due to the python versions, but due to the absence of gunicorn in the python 3 service. This hypothesis is supported by the next round of tests as will be shown below.

For both versions the bottleneck were their upstream services (tickenetwork, seller direct, etc.) so this test could not actually show the behaviour of both services under stress. We decided then that reducing the amount of allocations in half could then determine better whether python 3 can outperform python 2 in terms of efficiency. Here are the results:

Similarly to he previous round of tests, the results are reproducible. Here’s another set of runs:

It is clear for the previous graphs that performance is identical under low concurrency situations. Keep in mind that the low concurrency situation in this case corresponds to the double of the same number in the previous tests, due to having half of the allocations to handle the same load. It is encouraging to see that the difference is marginal, as we can claim more confidently that the difference seen in the previous tests can be attributed to the way requests were being handled by gunicorn.

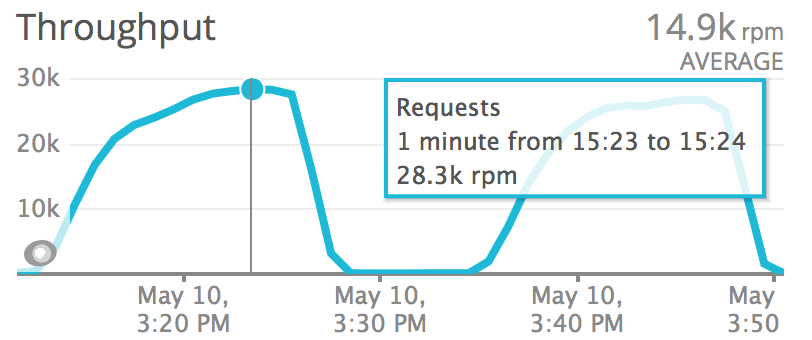
More interestingly in this case, we can see that under high concurrency, the python 3 service outperforms python 2 by around 5%. Who aggregating the number on minutes instead of seconds, the difference is more obvious:

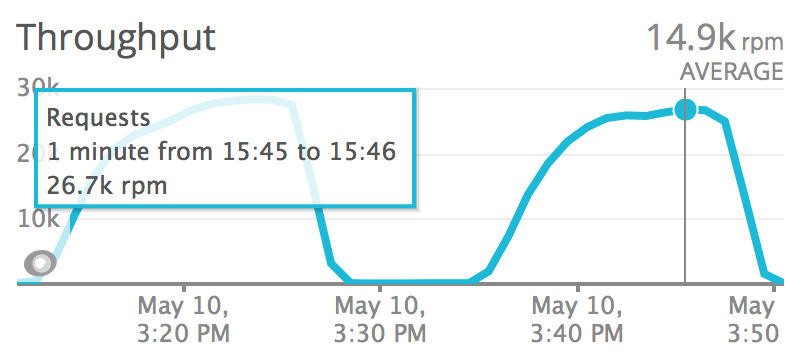
Requests per minute during the python 3 test:

Requests per minute during the python 2 test:

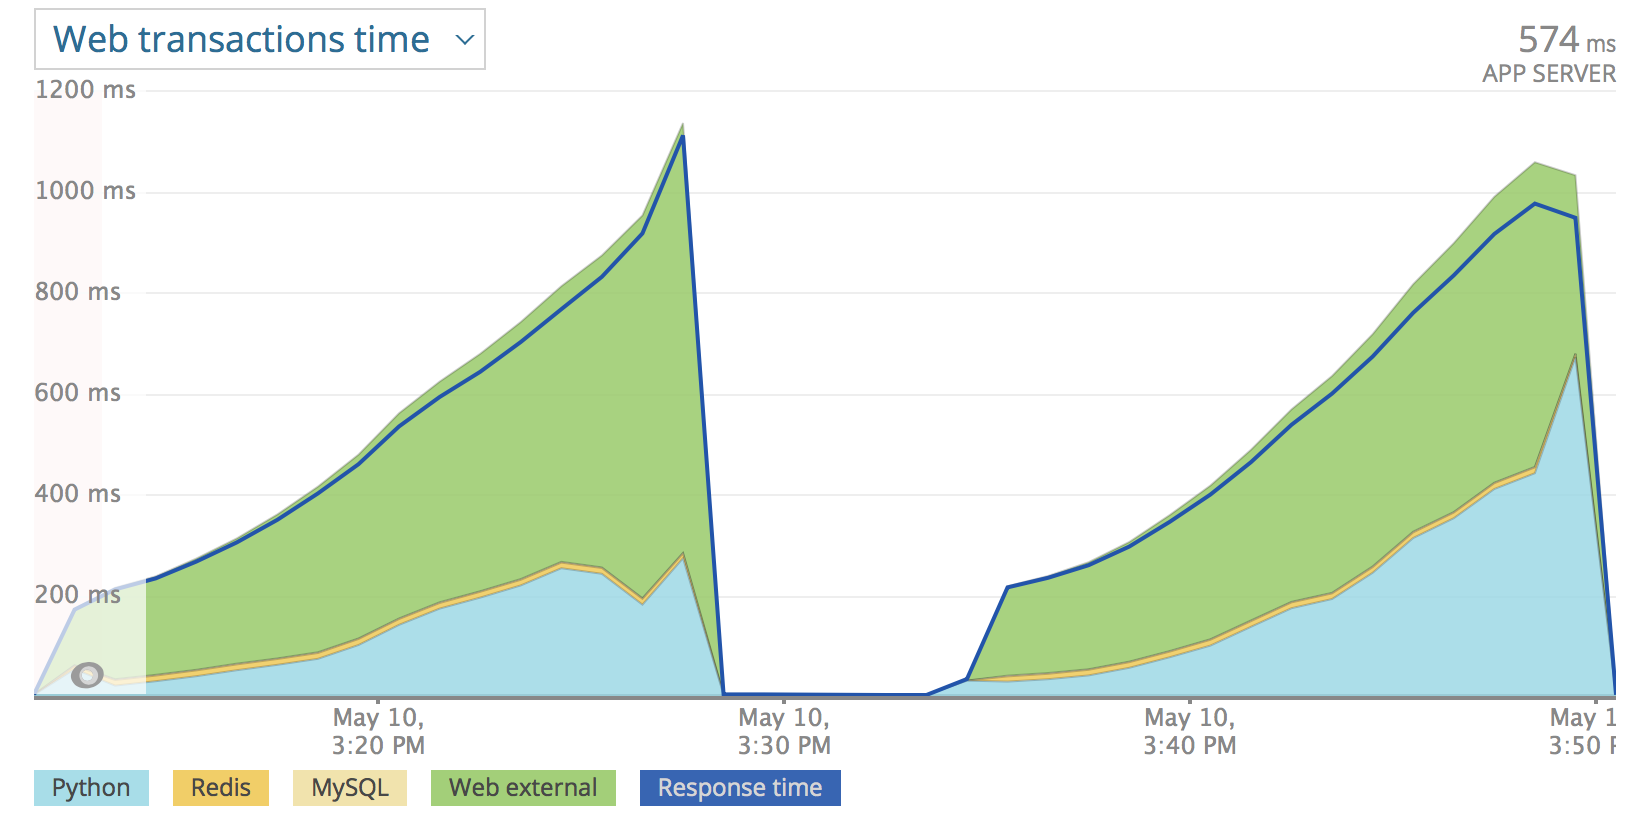
We can also see that the time spent in python is less when using python 3:

The left part of the graph was the test running python 3 and the right part of the graph is the master branch of listingfeed. We could conclude from this graph that python 3 is more efficient in the utilization of resources, leading to a small performance advantage when under load. In none of the tests we could notice any significant CPU usage difference between the 2 versions, which is to be expected for this IO bound service.

The bottom line

Migrating to python 3 only for performance benefits does not seem justifiable, at least not for applications like the listings service, but we can definitely expect to see a modest difference in performance when upgrading major versions.

On the other hand, benefits of using python 3 from the developer perspective may be more important than raw performance. There was a clear excitement by many members of the team when they saw we were working on migrating libraries to the new version.

Things like better typing support and static analysis tools may bring more robustness to our services and help us reduce the amount of regressions we commit to production.

Care Begets Care

There’s a phrase my friend, Stephanie, says often and whenever I think of it, I hear the words in her voice:

“Hurt people hurt people.”

There are a million examples of this out in the world every day: people lashing out as a reaction to the emotional wounds they’ve sustained, hurting others because they are hurting.

Being in service to customers often means doing some heavy emotional work. You observe and interact with people at various psychic levels and, for the sake of helping people, you have to be deft at identifying the feelings expressed and navigating them while you diagnose and resolve the issues brought to you.

So, knowing that a person’s emotional state can affect the way they act and interact with others it should go that the opposite of “hurt people hurt people” is true too:

“People who are shown care can better care for others.”

In CX (our Customer Experience team), we create an environment where we show each other that we care for each other. The leaders on our team work hand-in-hand to put things in place to amp up encouragement, to provide clear paths for each team member to be successful, and to emphasize a culture of assumed positive intention. Compassion and humor run throughout all of our internal interactions and generate space where we’re best able to care for the customers who come our way too.

This is an ongoing, growing, and ever changing process and it honestly takes quite a bit of trial and error and tons of feedback from all the members of the team. Luckily, there are some clear signs that a team is feeling taken care of:

  1. We take responsibility for our behavior
  2. We assess people correctly and from a place of empathy, giving people the benefit of the doubt
  3. We can identify where communication may be breaking down and can fill in the gaps to reconnect with others
  4. We are at ease so the impulse to attack with words disappears
  5. We see and comprehend the impact our behavior has on others
  6. We let down our guard so we are not constantly on the defensive
  7. We are not easily offended
  8. We do not react in anger
  9. If a resolution is not easily found for an issue, we see it as an opportunity for individual, team, and/or organizational improvement
  10. We have close friendships which each other and spend real quality time together

When any of those are out of whack on a team level or individually, it’s a red flag that something needs to be shown extra care. It deserves the same careful consideration and response as all the other pieces—minimizing the instances where knee-jerk reactions take place and provide only short term fixes. If your team is cared for, it’s like they proudly own a vintage car: one that’s polished, maintained, and set up to last for years to come. When it comes to CX, we also want to make sure that our “car” is set up and ready for passengers.

How do you create this space for your team? How do you acknowledge your team and show them care so they can turn around and best care for others?

Meet Us in Minneapolis: SeatGeek Goes to the Super Bowl

Fan at Fulfillment Center

It’s a cold Sunday morning in Minneapolis, but this isn’t your typical Sunday… it’s Super Bowl Sunday, and SeatGeek’s Inventory team is gearing up for our third and final day of delivering Super Bowl tickets to customers. You may be asking yourself, “Why deliver tickets in person, isn’t SeatGeek’s whole philosophy around using your phone to buy tickets and get in?” Well each year, there are a handful of major events that utilize good old fashioned paper tickets for admission, and the Super Bowl is their king.

With all the advancements in mobile ticketing, it’s odd the industry still uses hardstock (paper) tickets for high profile, expensive events. This is mostly due to hardstocks serving as one of the best formats for preventing fraudulent tickets from floating around. The paper format also allows for larger than average, holographic tickets with lots of fun details, allowing the ticket itself to act as a souvenir. And given the high dollar value of Super Bowl tickets (prices often start around $2,000 before the teams are even decided), SeatGeek’s number one priority is to eliminate the risk associated with shipping tickets via a third party carrier. The Super Bowl is that rare event where the ticket is as important as the game itself; so you’ll definitely want to hold on to it after all is said and done.

To combat the logistical difficulties of delivering thousand dollar tickets, our team flew out to Minneapolis (home of this year’s Super Bowl) to hand deliver tickets to all our customers at SeatGeek’s official fulfillment center for Super Bowl LII. This year’s center was located in a conference room at the Hotel Minneapolis, a few blocks away from the U.S. Bank Stadium where the game was played. And the Hotel Minneapolis served as a great location for stargazing. Several members of our team ran into the likes of superstar producer Pharrell in a hotel elevator and resident SeatGeek influencer Casey Neistat who picked up his tickets, camera in tow. Oh… and of course there were one or two dozen professional athletes roaming the halls.

Every event that requires a fulfillment center poses new challenges and questions for our team. And there’s a ton of work to be done; from tracking new orders in real time, to coordinating with sellers delivering tickets, to talking with customers and getting them pumped for the big game. But the biggest lesson is one we’re reminded of at every event - SeatGeek plays a key role in creating magic for all of our users. And the fulfillment center is always a great opportunity for our team to put a face to our amazing fans who call on SeatGeek for all their live event needs.

It’s an incredibly special experience seeing our users prepare to go to the big game, an event that will surely become a lifelong memory. When thinking of our users there’s a young boy who comes to mind, who came to pick up tickets with his dad. The father explained that the young man worked hard and saved up $4,000 over the last few years to attend this year’s Super Bowl. This boy chose SeatGeek to help fulfill his dream, which reminded us all just how important our role is in facilitating and protecting the dreams of our customers. And for each of us on SeatGeek’s Inventory team, our work securing tickets has taken on new meaning, knowing we helped turn a dream into reality.

SeatGeek Team

Software Design Patterns in Android Development

In just the past few years, mobile development has changed greatly in terms of not only what is capable on a pocket-sized device, but also in terms of what users want and expect out of the average app. With that, we developers have had to change how we build things in order to account for more complex, robust applications. The Android development community in particular has had a huge shift in focus (hopefully 🙏) from massive, logic-heavy Activities, to MVWhatever based approaches to help split our logic out. Most of us have also adopted the Observer Pattern through libraries like RxJava, dependency injection with Dagger, and more extensive testing. These tools, along with the adoption of Kotlin and the introduction of Architecture Components, have made it easier and easier to get off on the right foot with new Android apps to help ensure their maintainability and scalability for the future. However, these simple patterns are really just the tip of the iceberg and as our apps have some time to grow and mature in the wild, it is often necessary for us to employ other design patterns to allow applications to grow without becoming an unmaintainable mess. In this article, I’d like to take a look at some other common object oriented design patterns that have been around for while in the software world, but are talked about a little less in the typical Android development article. Before taking off and trying to implement these on your app as soon as you’re done reading, it’s worth noting that although these are good principles to abide by, using all or even some of them when they aren’t really necessary can lead to overly convoluted code that ends up being harder to understand than it needs to be. Not every app needs to implement them, but the key is to know when it’s time to start. Okay, enough of an intro, let’s get started!

Note: All examples are in Kotlin, so it’s recommended to be fairly familiar with the language and / or have this reference guide on hand

The Adapter Pattern

The adapter pattern is a strategy for adapting an interface from one system so that it works well in another, usually by abstracting away implementation via an interface. It is a common and useful design pattern that can help make components that are hard to reuse or integrate into a system more susceptible to doing so by changing (wrapping) their interface with one we design ourselves. In fact, it’s no coincidence that a RecyclerView.Adapter is named as such. Although every RecyclerView (or even each cell in a single RecyclerView) is going to likely display something different, we can utilize the common adapter interface for each ViewHolder. This allows for an easy way to hook into a RecyclerView but also gives the flexibility of allowing for different data types to be shown. This idea can be utilized in other areas as well. For example, say we’re working with a web API that doesn’t quite give us the data we need throughout the rest of our app. Maybe it gives us too much info, or gives shortened versions / acronyms of certain information in order to save cellular data, etc. We can build our own adapters to convert these API results to something that useful to the rest of our application. For example let’s take a look assume we’re making a basic ticketing app and have a TicketResponse that looks something like this after being converted from JSON to a Kotlin data class (note: not actually what our web API looks like):

1
2
3
4
5
6
data class TicketResponse(
    val seat: String = "R17S6",
    val price: Double = 50.55,
    val currency: String = "USD",
    val type: String = "Mobile"
)

For the sake of example, ignore the debate on whether or not this is a good looking API model. Let’s assume that it is, but regardless it’s a little messy for us to use throughout our application. Instead of R17S6 we’d really like to have a Row model with a value of 17, and a Seat model with a value of 6. We’d also like to have some sort of Currency sealed class with a USD child that will make life much easier than what the API currently gives us. This is where our the Adapter pattern comes in handy. Instead of having our (presumably Retrofit based) API return the TicketResponse model, we can instead have it return a nicely cleaned up Ticket model that has everything we want. Take a look below:

1
2
3
4
5
6
7
8
9
10
11
12
13
14
15
16
17
18
19
20
21
22
data class Ticket(
    val row: Row,
    val seat: Seat,
    val price: Currency,
    val type: TicketType
)

class TicketApiClient {
    fun getTicket(): Ticket {
        val ticketResponse : TicketResponse = getTicketResponse()
        return TicketAdapter.adapt(ticketResponse)
    }
}

object TicketAdapter {
     fun adapt(ticketResponse: TicketResponse) = Ticket(
        row = TicketUtil.parseRow(ticketResponse.seat),
        seat = TicketUtil.parseSeat(ticketResponse.seat),
        price = CurrencyUtil.parse(ticketResponse.price),
        type = TicketUtil.parseType(ticketResponse.type)
    )
}

Although there’s still some improvements that could be made here (Api likely would return an RxJava Single for threading purposes), this little adapter gives us a nice clean Ticket model that’s much easier to use throughout the rest of our app than the model our Api gives us. There’s obviously many more usages for the adapter pattern, but this is a pretty straightforward one that most apps will likely find useful at some point along the way.

The Façade Pattern

Simply put, the façade pattern hides complex code behind a simple, easy to use interface. As our apps grow, there is bound to be some complicated business logic that comes about in order to implement product requirements. The façade pattern helps us not to have to worry about how those complex business logic implementations work, and instead let us plug into them very easily. Staying on the ticket theme, we may have some caching mechanisms implemented to ensure that users are able to view their tickets, even though they may not have service in the venue when they scan in. This logic is probably housed in some sort of TicketStore class that may have references to our TicketApiClient class above, our database, and maybe even a memory cache so we can load tickets as quick as possible. Determining where to load the tickets from can get pretty complicated pretty quickly and we therefore want to keep this logic isolated and abstracted away from those classes simply trying to get a reference to a ticket object to display on the screen for example. Let’s say we have a basic Model-View-Presenter architecture set-up. Our presenter shouldn’t have to worry about whether the ticket comes from the server, a memory cache, or from disk, it should just be able to say “Hey TicketStore, give me a ticket!” and get one back without having any knowledge of where it came from. This is where the Façade pattern comes into play. Our TicketStore class is a Façade that hides anything related to storing tickets behind a simple interface with potentially one simple method called something like getTicket(id: Int) : Ticket. Integrating with this interface now becomes incredibly easy.

1
2
3
4
5
6
7
class TicketPresenter(view: TicketView, ticketStore: TicketStore) {
    init {
        ticketStore.getTicket(SOME_ID)?.let {
            view.show(it)
        }
    }
}

The Command Pattern

The command pattern utilizes objects (value / data classes) to house all the information needed to perform some action. This is a design pattern that is becoming more and more common in Android development these days, largely due to lambdas / higher-order functions (functions that take in functions) available in Java 8 / Kotlin. With the command pattern, we can encapsulate a request or an action as an object. This object can take in function types that are executed when the request is handled. We tend to typically use these with third party libraries such as RxJava, but they can actually be useful for various internal APIs that we may have throughout our applications as well. Consider some sort of UI transition API we’ve created internally to help manage different view states. Let’s say we want to transition from the Loading state of our screen to the Content state. Let’s also say want certain actions to be executed before and after we make this transition. With the command pattern (and Kotlin), this becomes fairly trivial.

First we have our Transition class that takes in the layout to transition to, as well as functions to be executed during the transition process.

1
2
3
4
5
6
data class Transition(
    @LayoutRes val layoutRes: Int,
    val beforeTransition: () -> Unit,
    val onViewInflated: (View) -> Unit,
    val afterTransition: () -> Unit
)

We then have some sort of TransitionCoordinator class that is able to take in Transition objects and perform our transition as well as execute these various actions when needed. The key piece of the puzzle that makes the command pattern so useful is that the TransitionCoordinator doesn’t need really know anything about the calling class in order to go about this transition process. It is very generic and can take in functions from any class without knowing its innards. This makes the command pattern very powerful while being quite generic. This TransitionCoordinator might look something like this:

1
2
3
4
5
6
7
8
9
10
11
12
13
14
class TransitionCoordinator {
    fun startTransition(transition: Transition) {
        transition.run {
            beforeTransition()
            val view = inflate(layoutRes)
            onViewInflated(view)
            doTransition()
            afterTransition()
        }
    }

    fun inflate(@LayoutRes layoutRes: Int): View = { /* Inflation code */ }

}

Thanks to the brevity of Kotlin, we are able to execute this transition process in very few lines of code.

In our Activity (or wherever we’re calling this code) we can now do something like this.

1
2
3
4
5
6
7
8
transitionCoordinator.startTransition(
    Transition(
        layoutRes = R.layout.activity_sample,
        beforeTransition = { unsubscribeObservables() },
        onViewInflated = { view -> bind(view) },
        afterTransition = { fetchData() }
    )
)

In this scenario we want to transition to some sample activity, unsubscribe to some observables before our transition, bind the newly inflated view upon transition, and fetch data after we’ve transition. Of course, once we brought this into the real world, our implementation would likely not be this simple, but it’s easy to see that encapsulating these method calls with “Command” objects makes them generic and easy to use.

Null Object Pattern

One other convenient design pattern, but possibly less frequently used is the “Null Object Pattern”. For those of us who have been Android developers for ~2+ years (before Kotlin came into play), we are all too familiar with null pointer exceptions that bring our apps to a crippling crash. Kotlin has helped to reduce this greatly, but there are still some cases in which we may need to account for null or empty states. The null object pattern can help us in scenarios where, although we may not have the necessary data to say populate a view, we still want to show some sort of empty (null) state in the meantime. This is only one potential example, but is a good place to start. Consider some sort of MVWhatever framework we’ve implemented in our UI layer. Our View takes in ViewModels and shows them on the screen. Let’s say for instance we’re displaying a user’s profile. In the ideal scenario, we simply fetch the profile from our database, cache, api or wherever and display it on the screen. Simple as that. However, what do we show if api request is taking a very long time? Maybe the user has bad cell signal or our server is at high demand for some reason. Of course we’ll want to show some sort of loading indicator here to let the user know we’re working on loading this info, but one other cool thing we can do is actually populate the view with an “null” or empty user state. Many popular apps (Facebook, Twitter, etc) utilize this type of pattern to give the app the appearance of loading even faster than it technically is. Let’s take a look at brief bit of code to help make better sense of this.

1
2
3
interface ViewModel {
     val titleText: String
}
1
data class UserViewModel(val user: User, override val titleText: String = user.name) : ViewModel
1
data class NullViewModel(override val titleText: String = "") : ViewModel

So what we have here is a ViewModel interface that holds the titleText we want to show on the screen as well as a couple of data classes that implement this interface and pass the necessary bits of data for the view to show what it needs to. Take a look at the NullViewModel data class. It might look pointless to pass this object to the view since there’s really nothing to show. However, by passing this model instead of waiting, our view can start to draw and allocate space on the screen. We can then even recycle this view when a real UserViewModel is available to make our rendering time even faster. Again, this is just one of many applications of this design pattern, and although it’s very simple it can be very useful in the right scenario.


Hope you enjoyed this little list of some design patterns less talked about in the Android development community. Again, there are not always applications for all of these, and they should only be used when the provide a tangible benefit to your app. There’s many more design patterns out there, each with their own specific purpose. A couple great books that go more in depth into different patterns can be found here and here. Happy coding!


We’re hiring! Learn more here

Customer and Experiences and ‘Customer Experience’

When I was in 8th grade, I got a once-in-a-lifetime opportunity to travel from my small town to Disney World as part of a school trip. It was an extra special experience in my mind because it was also my first time ever leaving home without my parents right by my side. Independence!

My teacher gave our whole group tons of agency on the trip: We were responsible for all of our own meals, and we dictated most of our own daily schedules. We were a special kind of obnoxious tour group, I’m sure. I mention the meal thing specifically because my strongest memory from the whole trip involved a lunch that changed my life.

When you’re first stepping into big responsibilities there can be a learning curve. Sometimes small things get dropped or forgotten. In this case, that small thing was my very expensive retainer which I had forgotten about and dropped directly into the trash can outside Frontierland.

Of course, I was embarrassed. I can only imagine the hard work Disney cast members do on a regular day and the last thing I wanted to do was to add “dig through the garbage to fish out a tween’s mouthguard” to their to-do list. I also knew what would happen if I flew home and told my parents that I’d doomed my teeth back into being crooked. Braces are expensive. This trip was expensive. Having one ruin the other was not the best situation.

I was stuck at the trash can, panicked. Other people passed, dumping their trays before heading off to Splash Mountain. I swear, Disney employees must have a sixth sense that helps them identify kids who are about to cry because this cast member got to me right in time. “What’s wrong?” She asked with the warmest, kindest, most genuine tone you can imagine. I don’t even think I said the entire word “retainer” before she ripped the top off the can and started hunting. She found it within seconds and saved the day. What was even more surprising was that she thanked me for letting her help. What the heck?!

I wasn’t “garbage she had to go through” at her job. To her, I was a person in the middle of the experience of my life, facing an issue that brought all that to a halt. She knew what she could do to positively affect the person at the other end of this interaction and she dove in without hesitation. That is amazing and it showed me how much of an impact someone in service can have on others.

As a company, we’re obsessed with getting more people out to live events they care about. We pour our energy into creating a smart, intuitive website and app that connects people and unlocks their ability to go make memories with the people they care about, seeing the artists and teams they love. It’s a sweet gig. Obviously an app can’t answer every question or resolve every issue that may pop up, which is why we have a dedicated (and sizeable!) customer experience team in the first place.

We have a special CX team at SeatGeek. A group so passionate about helping people create memorable experiences that we built careers around it. We dive in without hesitation and help people resolve anything that’s stopping their outing from being the time of their life.

What’s extra nice is that our work in CX goes beyond emails and phone calls. We have high level conversations about what our customers go through at every step, from browsing for events to the very last song performed during an encore, and we get to base them on the first-hand accounts we hear directly from fans. Then we use all of this information to connect with the other teams at SeatGeek and together we improve.

Empathy is the name of the game and it’s not just a buzzword that we fling around. We’re bold in our consumer advocacy: protecting them with our SeatGeek guarantee, anticipating their needs, and using the focus of who is on the other end to influence our decision making. We are truly in service to others in a way that would make Disney proud.

In a world that’s becoming more and more automated, our team is excited to learn and offer new and better ways for customers to reach us – we are a tech company, after all. However, we take special care to maintain a human touch at the end of those channels. Email, phone, or social media, any way someone tries to reach us there’s another person waiting and ready to help.

We’re dedicated and committed to connecting with the person on the other end. Reach out to us and let’s dive in.